Grove-Temperature_Sensor

The Grove - Temperature Sensor uses a Thermistor to detect the ambient temperature. The resistance of a thermistor will increase when the ambient temperature decreases. It's this characteristic that we use to calculate the ambient temperature. The detectable range of this sensor is -40 - 125ºC, and the accuracy is ±1.5ºC.

Specifications
Voltage: 3.3 ~ 5V
Max power rating at 25℃: 300mW
Zero power resistance: 10 KΩ
Operating temperature range: -40 ~ +125 ℃
Demonstration
With Arduino
Here is an example to show you how to read temperature information from the sensor.
Connect the module to the Analog port 0 of Grove - Basic Shield using the 4-pin grove cable.
Plug the Grove - Basic Shield into Arduino.
Connect Arduino to PC by using a USB cable.

- Upload Code below. Please click here if you do not know how to upload.
/*
/* Grove - Temperature Sensor demo v1.0
* This sensor detects the environment temperature,
* Connect the signal of this sensor to A0, use the
* Serial monitor to get the result.
* By: https://www.seeedstudio.com
*/
#include <math.h>
int a;
float temperature;
int B=3975; //B value of the thermistor
float resistance;
void setup()
{
Serial.begin(9600);
}
void loop()
{
a=analogRead(0);
resistance=(float)(1023-a)*10000/a; //get the resistance of the sensor;
temperature=1/(log(resistance/10000)/B+1/298.15)-273.15;//convert to temperature via datasheet ;
delay(1000);
Serial.print("Current temperature is ");
Serial.println(temperature);
}
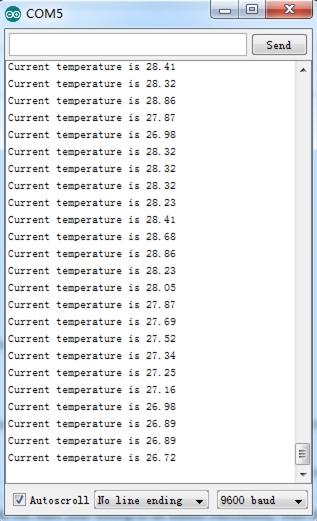
- You can check the readings via the Serial Monitor. The default unit is Celsius degree.
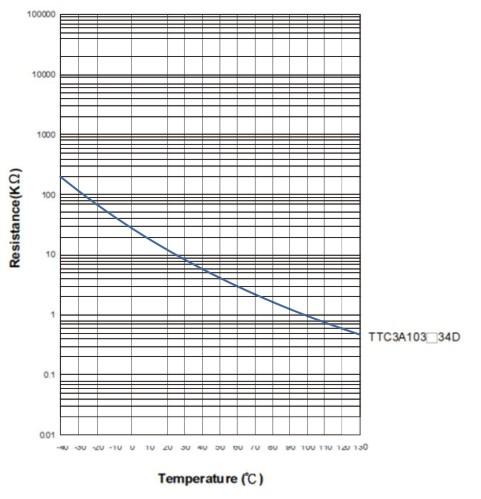
As a reference, the following is the resistance curve of TTC3A103*39H, the thermistor we used on this sensor. The higher the temperature goes, the smaller the resistance becomes.
With Raspberry Pi
1.You should have got a raspberry pi and a grovepi or grovepi+.
2.You should have completed configuring the development enviroment, otherwise follow here.
3.Connection
- Plug the sensor to grovepi socket D3 by using a grove cable.
4.Navigate to the demos' directory:
cd yourpath/GrovePi/Software/Python/
- To see the code
nano grove_temperature_sensor.py # "Ctrl+x" to exit #
import time
import grovepi

# Connect the Grove Temperature Sensor to analog port A0
# SIG,NC,VCC,GND
sensor = 0

while True:
try:
temp = grovepi.temp(sensor,'1.1')
print "temp =", temp
time.sleep(.5)

except KeyboardInterrupt:
break
except IOError:
print "Error"
5.Run the demo.
sudo python grove_temperature_sensor.py
With Beaglebone Green
To begin editing programs that live on BBG, you can use the Cloud9 IDE.
As a simple exercise to become familiar with Cloud9 IDE, creating a simple application to blink one of the 4 user programmable LEDs on the BeagleBone is a good start.
If this is your first time to use Cloud9 IDE, please follow this link.
Step1: Click the "+" in the top-right to create a new file.

Step2: Copy and paste the following code into the new tab
from Adafruit_I2C import Adafruit_I2C
import time

ADDR_ADC121 = 0x50

REG_ADDR_RESULT = 0x00
REG_ADDR_ALERT = 0x01
REG_ADDR_CONFIG = 0x02
REG_ADDR_LIMITL = 0x03
REG_ADDR_LIMITH = 0x04
REG_ADDR_HYST = 0x05
REG_ADDR_CONVL = 0x06
REG_ADDR_CONVH = 0x07

i2c = Adafruit_I2C(ADDR_ADC121)

class I2cAdc:
def __init__(self):
i2c.write8(REG_ADDR_CONFIG, 0x20)

def read_adc(self):
"Read ADC data 0-4095."
data_list = i2c.readList(REG_ADDR_RESULT, 2)
        #print 'data list', data_list
data = ((data_list[0] & 0x0f) << 8 | data_list[1]) & 0xfff
return data

if __name__ == '__main__':
    # Connect the Grove - I2C ADC to I2C Grove port of Beaglebone Green.
adc = I2cAdc()
while True:
print 'sensor value ', adc.read_adc()
time.sleep(.2)
Step3: Save the file by clicking the disk icon with a name "grove_i2c_adc.py".
Step4: Create a new file Copy the following code into the new tab and save it with the .py extension.
import time
import math
import grove_i2c_adc
import Adafruit_BBIO.GPIO as GPIO

BUZZER = "P9_22"            # GPIO P9_22
GPIO.setup(BUZZER, GPIO.OUT)

# The threshold to turn the buzzer on 28 Celsius
THRESHOLD_TEMPERATURE = 28

adc = grove_i2c_adc.I2cAdc()

#   The argument in the read_temperature() method defines which Grove board(Grove Temperature Sensor) version you have connected.
#   Defaults to 'v1.2'. eg.
#       temp = read_temperature('v1.0')          # B value = 3975
#       temp = read_temperature('v1.1')          # B value = 4250
#       temp = read_temperature('v1.2')          # B value = 4250
def read_temperature(model = 'v1.2'):
"Read temperature values in Celsius from Grove Temperature Sensor"
    # each of the sensor revisions use different thermistors, each with their own B value constant
if model == 'v1.2':
bValue = 4250  # sensor v1.2 uses thermistor ??? (assuming NCP18WF104F03RC until SeeedStudio clarifies)
elif model == 'v1.1':
bValue = 4250  # sensor v1.1 uses thermistor NCP18WF104F03RC
else:
bValue = 3975  # sensor v1.0 uses thermistor TTC3A103*39H

total_value = 0
for index in range(20):
sensor_value = adc.read_adc()
total_value += sensor_value
time.sleep(0.05)
average_value = float(total_value / 20)

    # Transform the ADC data into the data of Arduino platform.
sensor_value_tmp = (float)(average_value / 4095 * 2.95 * 2 / 3.3 * 1023)
resistance = (float)(1023 - sensor_value_tmp) * 10000 / sensor_value_tmp
temperature = round((float)(1 / (math.log(resistance / 10000) / bValue + 1 / 298.15) - 273.15), 2)
return temperature

# Function: If the temperature sensor senses the temperature that is up to the threshold you set in the code, the buzzer is ringing for 1s.
# Hardware: Grove - I2C ADC, Grove - Temperature Sensor, Grove - Buzzer
# Note: Use P9_22(UART2_RXD) as GPIO.
# Connect the Grove Buzzer to UART Grove port of Beaglebone Green.
# Connect the Grove - I2C ADC to I2C Grove port of Beaglebone Green, and then connect the Grove - Temperature Sensor to Grove - I2C ADC.
if __name__ == '__main__':

while True:
try:
            # Read temperature values in Celsius from Grove Temperature Sensor
temperature = read_temperature('v1.2')

            # When the temperature reached predetermined value, buzzer is ringing.

print "temperature = ", temperature

except IOError:
print "Error"
Step5: Connect Grove Temperature to Grove I2C ADC which is connected to Grove I2C socket on BBG.
Step6: Run the code. You'll find that the terminal outputs Temperature value every 2 seconds.
Schematic Online Viewer
Resource
Projects
The Environment Cube! Know the Land Beneath You using Sigfox: A cube with all the necessary sensors, suitable for a wide range of applications like agriculture, monitoring, ,etc.
Tech Support & Product Discussion
Thank you for choosing our products! We are here to provide you with different support to ensure that your experience with our products is as smooth as possible. We offer several communication channels to cater to different preferences and needs.