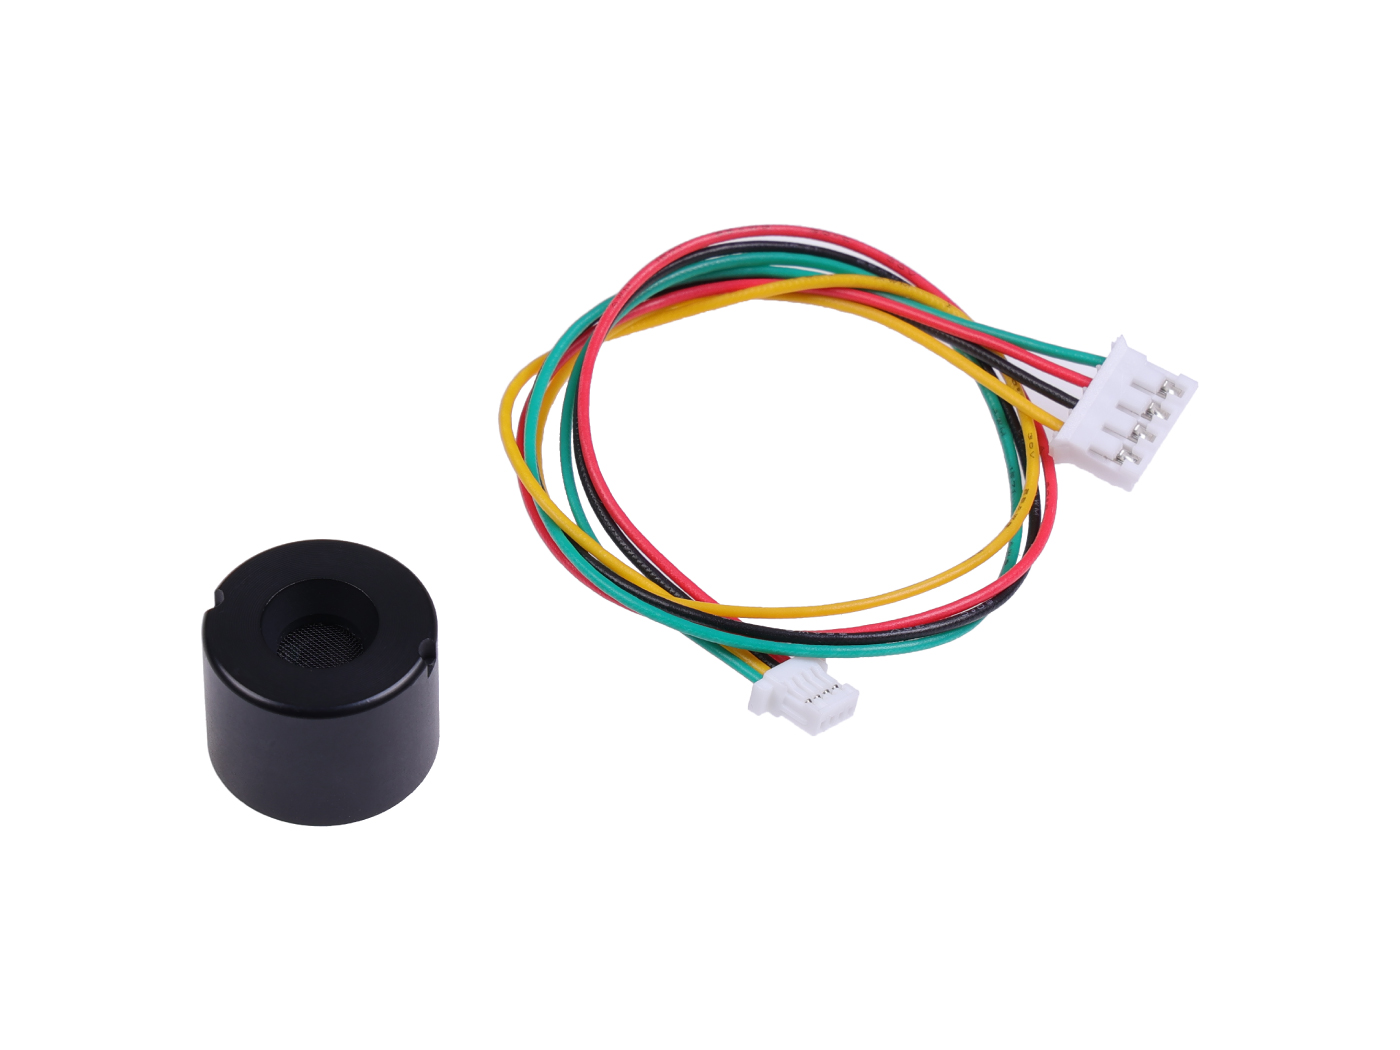
Grove Ultrasonic Sensor (SMS812)
Introduction
Grove Ultrasonic Sensor (SMS812) is a miniature, ultra-low power ranging sensor. Grove Ultrasonic Sensor (SMS812) is based on the ultrasonic time-off-light (ToF) principle, and is designed with related acoustics, electricity and algorithms. High precision distance measurement is achieved through the energy difference of ultrasonic echo signals on the surface of different materials, and output millimeter-level distance information and its echo energy intensity value, and can also output flag bits to distinguish soft and hard materials. Furthermore, it can be used for cleaning robots to identify ground materials and measure distances within a certain range. It is small size and easy to install.
Application
- The cleaning robot recognizes the soft and hard materials on the ground
- Home service robot or robot vacuum cleaner to obtain ground information
- 3D printer lever detection
Features
- Millimeter-level ranging accuracy, great ranging stability
- Recognize soft and hard materials and output I/O information
- The detection distance up to 20-50mm and blind area is small
- Arduino support
Hardware Overview
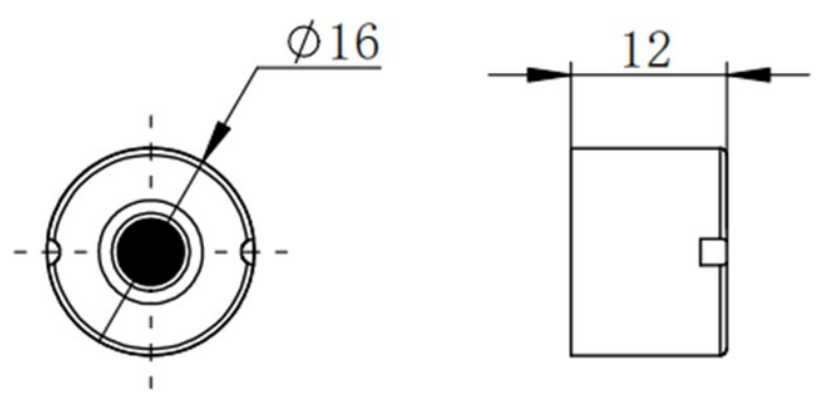
- The structure of this sensor is a cylindrical and made by plastic injection molding.
- The dimensions in the above figure are in millimeters.
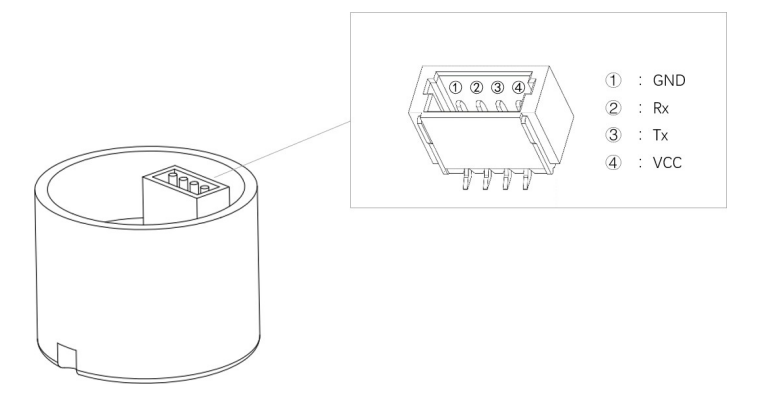
This interface is PH1.0-4P plug connector. And the definition of the pin is below:
| Pin | Type | Description | Defaults | Data stream |
| GND | Power supply | Negative | 0V | |
| Tx | Output | System serial port output | Ladar to Peripherals | |
| Rx | Input | System serial port input | Peripherals to Ladar | |
| VCC | Power supply | Positive | 3.3V |
Getting Started
Hardware Preparation
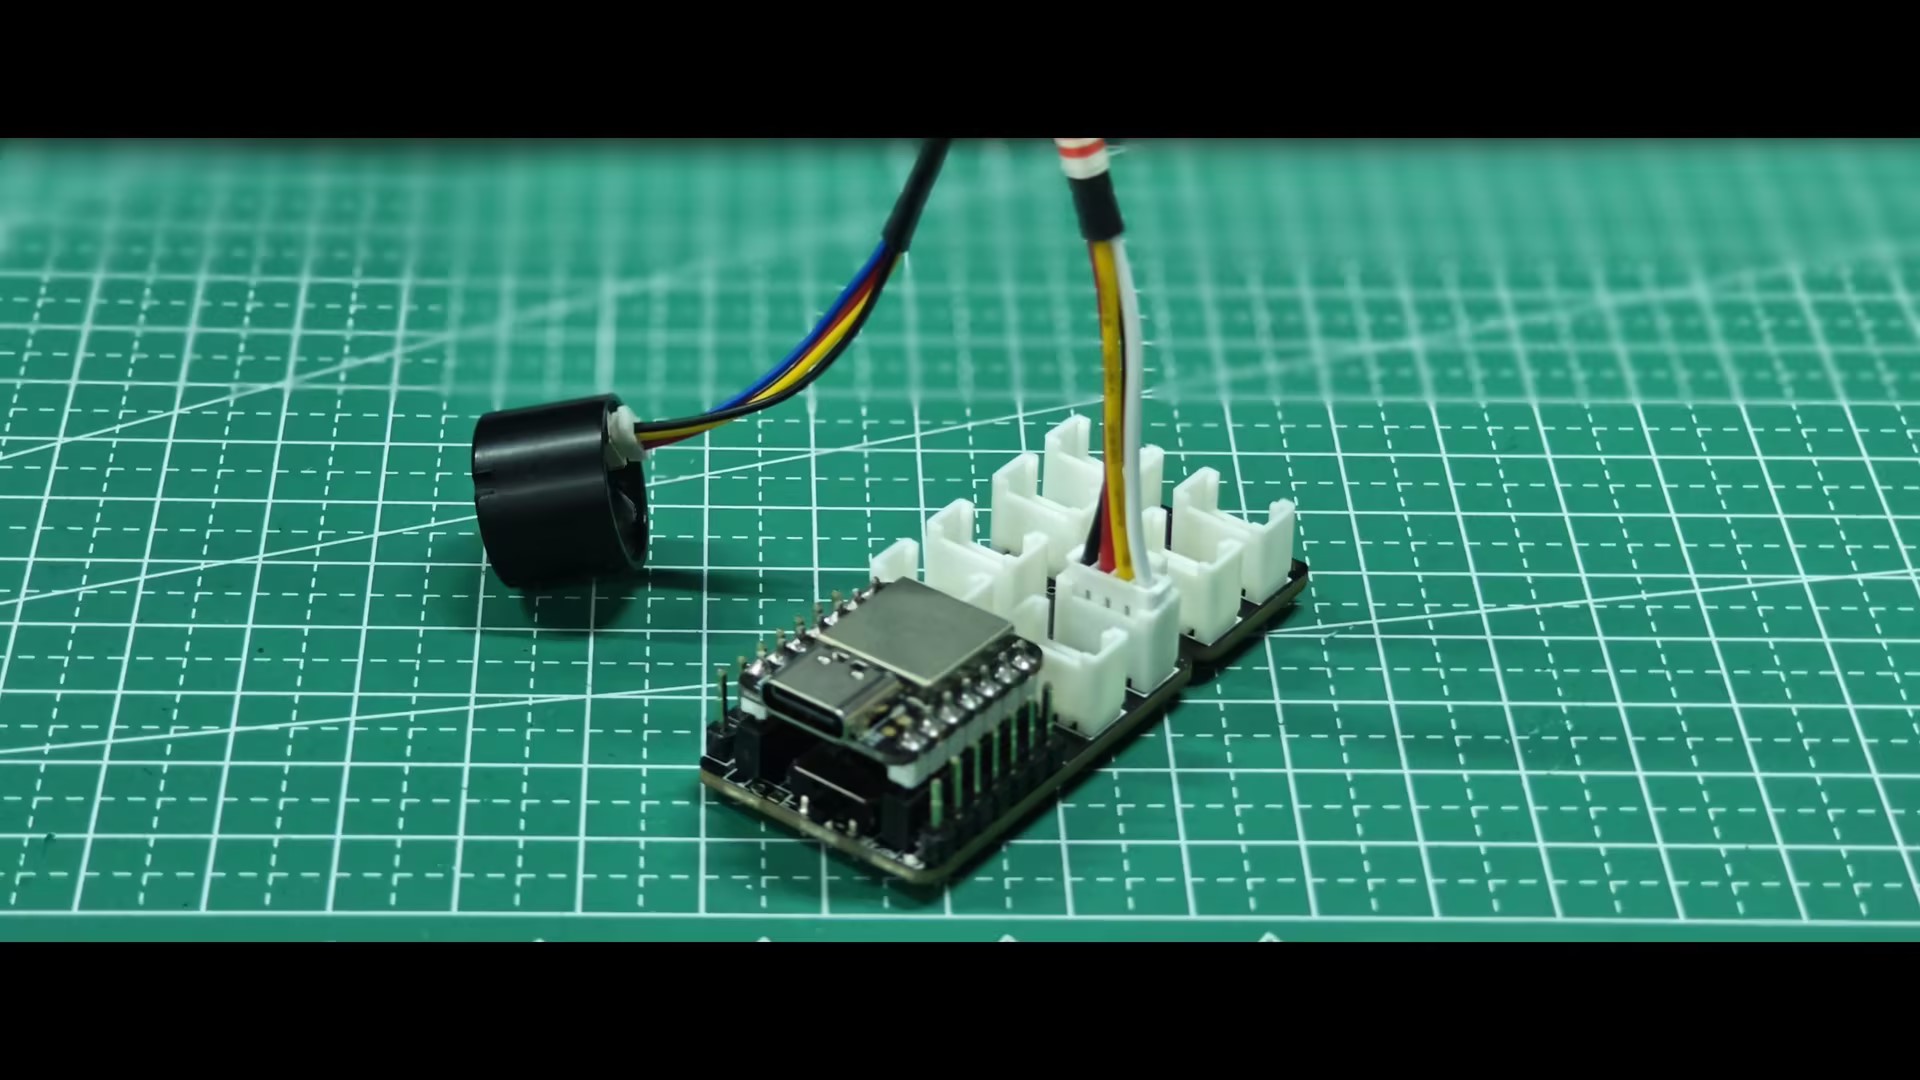
This routine will introduce the use of this ultrasonic radar using the XIAO SAMD21 as the master control. For the convenience of wiring, we will also use the Grove expansion board. You can choose one according to your actual needs.
| XIAO SAMD21 | Grove Base for XIAO | Grove Ultrasonic Sensor (SMS812) |
|---|---|---|
 |  |  |
Then, connect the ultrasonic radar to the UART interface of the XIAO.
Arduino Library Overview
If this is your first time using Arduino, we highly recommend you to refer to Getting Started with Arduino or see the simple tutorial below:
The button below will take you directly to our Arduino program library for the Grove Ultrasonic Sensor (SMS812).
Function
Before we get started developing a sketch, let's look at the available functions of the library.
void setIOMode()—— This function is used to set the radar to IO mode, which is mainly used to detect the target material.void setUARTMode()—— This function is used to set the radar to UART mode, UART mode radar will actively report distance and material information.void setUARTREQMode()—— This function is used to set the radar to UART REQ mode, in which the distance and material information can only be queried by sending a query command.void checkUARTREQ(int delaytime = 0, bool showSwitch = true)—— This function is used in UART REQ mode to query the detected material and distance.Input Parameters
delaytime: The default value is 0. This parameter controls the time in milliseconds for the query command to be issued.showSwitch: The default is on. This parameter controls whether the original data frame is printed out.
bool getFrame(bool showSwitch = true)—— This function is used to get the original data frame.Input Parameters
showSwitch: The default is on. This parameter controls whether the original data frame is printed out.
bool parseDatagram(bool showSwitch = false)—— This function is used to parse the original data frame.Input Parameters
showSwitch: The default is off. This parameter controls whether the original data frame is printed out.
Installation
Since you have downloaded the zip Library, open your Arduino IDE, click on Sketch > Include Library > Add .ZIP Library. Choose the zip file you just downloaded,and if the library install correct, you will see Library added to your libraries in the notice window. Which means the library is installed successfully.

XIAO Example
Step 1. You need to Install an Arduino Software.

Step 2. Launch the Arduino application.
Step 3. Select your development board model and add it to the Arduino IDE.
If you want to use Seeeduino V4.2 for the later routines, please refer to this tutorial to finish adding.
If you want to use XIAO SAMD21(Seeeduino XIAO) for the later routines, please refer to this tutorial to finish adding.
If you want to use XIAO RP2040 for the later routines, please refer to this tutorial to finish adding.
If you want to use XIAO nRF52840 for the later routines, please refer to this tutorial to finish adding.
If you want to use XIAO ESP32C3 for the later routines, please refer to this tutorial to finish adding.
If you want to use XIAO ESP32S3 for the later routines, please refer to this tutorial to finish adding.
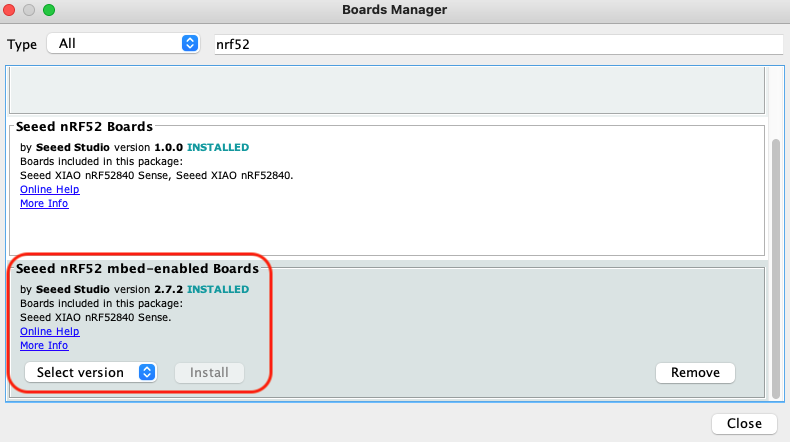
For XIAO nRF52840, please select Seeed nRF52 mbed-enabled Boards, otherwise an error may be reported when running programs.
Step 4. Install the Arduino code library.
Demo 1: IO Mode Usage
This example will guide you through the process of printing out the flag bits to distinguish soft and hard materials. Here is the reference code for arduino:
#include "sms812.h"

const int radarPin = A7;

//#include <SoftwareSerial.h>
// Choose any two pins that can be used with SoftwareSerial to RX & TX
//#define RX_Pin A6
//#define TX_Pin A7

//SoftwareSerial mySerial = SoftwareSerial(RX_Pin, TX_Pin);

// we'll be using software serial
//SMS812_Sensor radar = SMS812_Sensor(&mySerial);

// can also try hardware serial with
SMS812_Sensor radar = SMS812_Sensor(&Serial1);

void setup() {
  // put your setup code here, to run once:
  Serial.begin(115200);

  Serial1.begin(115200);
  //  mySerial.begin(115200);

  pinMode(radarPin, INPUT);

  while(!Serial);   //When the serial port is opened, the program starts to execute.
  Serial.println("Ready");

  radar.setIOMode();
}

void loop() {
  // put your main code here, to run repeatedly:
  int value = analogRead(radarPin); // Read level status of D7 pin
  Serial.println(value);
  delay(500);
}
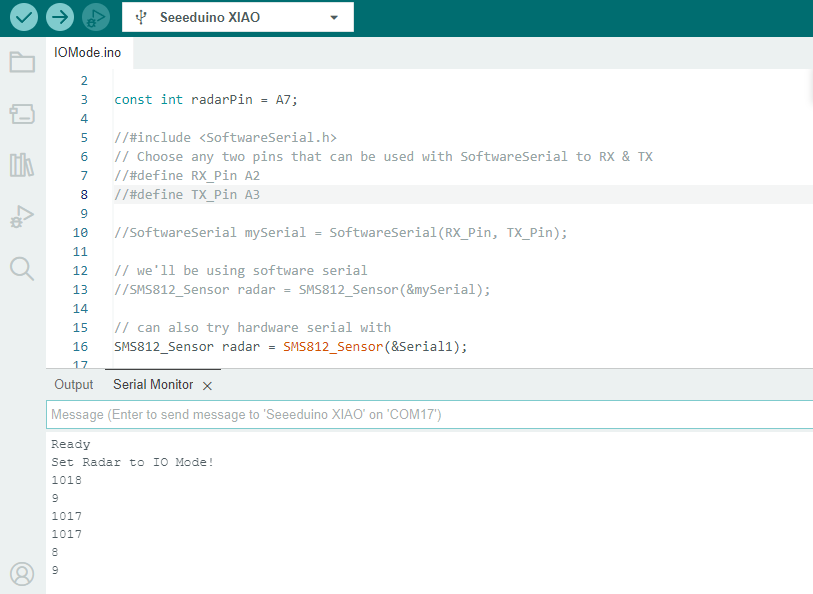
After you activate the IO mode, you should know that if the US5 sensor recognize the soft material, its TX pin will send the flag bits 0x01 to the board, otherwise, the hard material is 0x00, so you should set the radarPin as A0(which connect the TX pin of sensor) or the pin which support analog inputs.
The high value above 1000 means recognizing the hard material, and the value below the 20 means recognizing the soft material or air.
So, when you move the sensor in front of the will see the serial output like below:
Demo 2: UART Mode Usage
For UART mode, the radar outputs measurements at a rate of 100Hz. The format of the data telegram is shown in the table below.
| Header frame | Command frame | Data length frame | Data frame | Checksum frame |
|---|---|---|---|---|
| 0xAA 0xAA | 0xFD | 0x04 | -- | CS |
The data bits occupy 4 Byte. the first 1 Byte is the material flag bit, 0 means hard material and 1 means soft material. For soft materials, it will be impossible to measure the distance. Then there is the distance value, which accounts for 2 Byte in millimeters. The last 1Byte is the intensity value, indicating the strength of the received ultrasonic signal.
| Material flag bit | Distance value | Strength |
|---|---|---|
| 1 Byte | 2 Byte | 1 Byte |
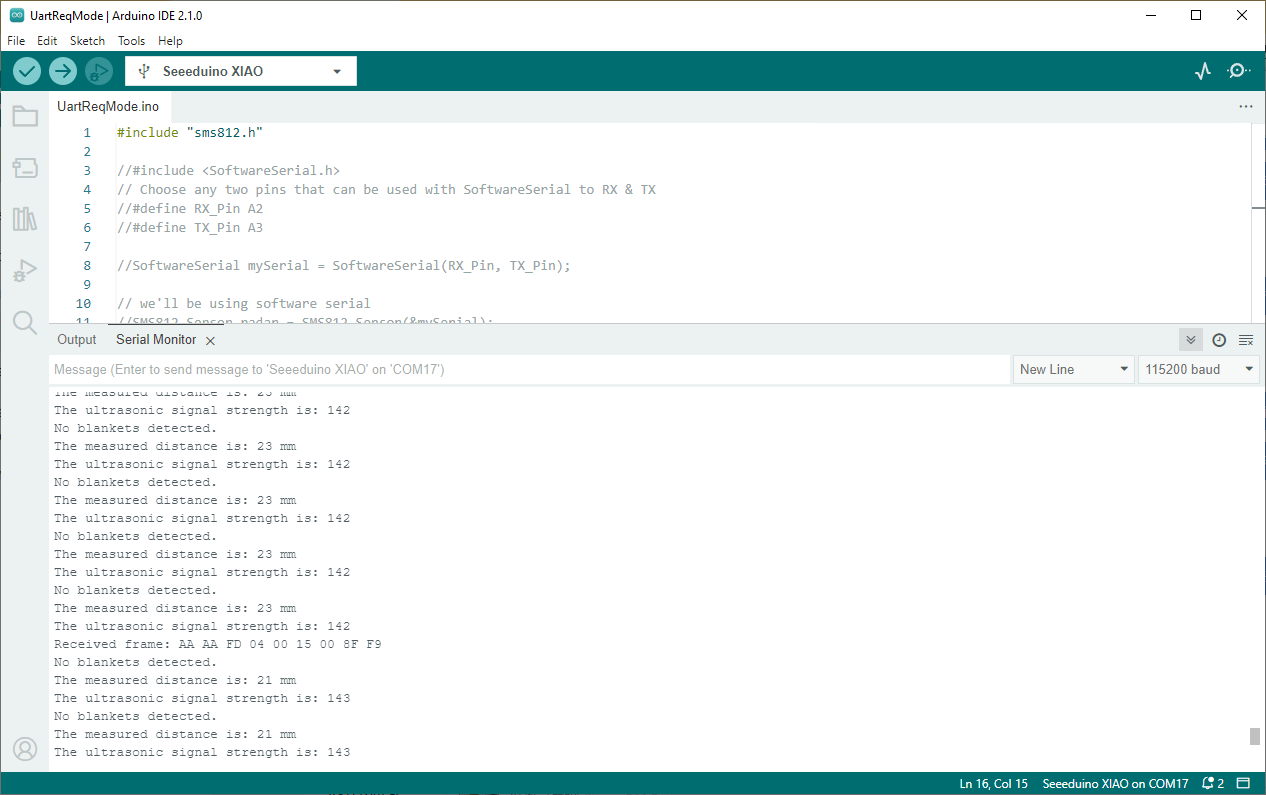
In this example, we will use the functions in the library to parse the received data frames and print out all the feature data reported by the Sensor active via the serial port.
The hardware serial port on the board XIAO SAMD21 is the UART interface pin A6 and A7.You can also use any two pins as the software serial.
#include "sms812.h"

//#include <SoftwareSerial.h>
// Choose any two pins that can be used with SoftwareSerial to RX & TX
//#define RX_Pin A2
//#define TX_Pin A3

//SoftwareSerial mySerial = SoftwareSerial(RX_Pin, TX_Pin);

// we'll be using software serial
//SMS812_Sensor radar = SMS812_Sensor(&mySerial);

// can also try hardware serial with
SMS812_Sensor radar = SMS812_Sensor(&Serial1);

void setup() {
  // put your setup code here, to run once:
  Serial.begin(115200);

  Serial1.begin(115200);
  //  mySerial.begin(115200);

  while(!Serial);   //When the serial port is opened, the program starts to execute.
  Serial.println("Ready");

  radar.setUARTMode();
}

void loop() {
  // put your main code here, to run repeatedly:

  // Prints only the acquired raw data frames
//   radar.getFrame();
//   delay(1);                //Add time delay to avoid program jam

  // Parses the contents of the data frame. If the function parseDatagram is given a true argument, the raw data frame display is enabled.
  if(radar.parseDatagram(true)){
    if(radar.material == 0x00){
      Serial.println("No blankets detected.");
      Serial.print("The measured distance is: ");
      Serial.print(radar.distance);
      Serial.println(" mm");
      Serial.print("The ultrasonic signal strength is: ");
      Serial.println(radar.strength);
    }
  }
  delay(1);                //Add time delay to avoid program jam
}
After upload the code to the board, you move the sensor in front of the hard material(soft material will not output the parsed data), you can see the parsed data below:
Demo 3: UART REQ Mode Usage
In this example, we set the delaytime parameter to 1000, meaning that we poll for 1 second to send a command query. And the sensor will feedback the ranging result by the raw message, which length is 9 bytes.
#include "sms812.h"

//#include <SoftwareSerial.h>
// Choose any two pins that can be used with SoftwareSerial to RX & TX
//#define RX_Pin A2
//#define TX_Pin A3

//SoftwareSerial mySerial = SoftwareSerial(RX_Pin, TX_Pin);

// we'll be using software serial
//SMS812_Sensor radar = SMS812_Sensor(&mySerial);

// can also try hardware serial with
SMS812_Sensor radar = SMS812_Sensor(&Serial1);

void setup() {
  // put your setup code here, to run once:
  Serial.begin(115200);
  Serial1.begin(115200);
  pinMode(A7, INPUT);

  //  mySerial.begin(115200);

  while(!Serial);   //When the serial port is opened, the program starts to execute.

  Serial.println("Ready");

  radar.setUARTREQMode();
}

void loop() {
  // put your main code here, to run repeatedly:
  radar.checkUARTREQ(1000, true);      // Check radar information every second. And turn on raw data frame display.

  // Parses the contents of the data frame. If the function parseDatagram is given a true argument, the raw data frame display is enabled.
  if(radar.material == 0x00){
    Serial.println("No blankets detected.");
    Serial.print("The measured distance is: ");
    Serial.print(radar.distance);
    Serial.println(" mm");
    Serial.print("The ultrasonic signal strength is: ");
    Serial.println(radar.strength);
  }
}
Resources
Tech Support & Product Discussion
Thank you for choosing our products! We are here to provide you with different support to ensure that your experience with our products is as smooth as possible. We offer several communication channels to cater to different preferences and needs.