Grove - I2C Motor Driver V1.3

The Grove - I2C Motor Driver V1.3 (latest version) can directly control Stepper Motor or DC Motor. Its heart is a dual channel H-bridge driver chip(L298N)that can handle current up to 2A per channel, controlled by an Atmel ATmega8L which handles the I2C communication with platforms such as Arduino. Both motors can be driven simultaneously while set to a different speed and direction. It can power two brushed DC motors or one 4-wire two-phase stepper motor. It requires a 6V to 15V power supply to power the motor and has an onboard 5V voltage regulator which can power the I2C bus and the Arduino(selectable by jumper). All driver lines are protected by diodes from back-EMF.
Contrast to the Grove - I2C motor driver V1.2, the V1.3 enables users to control the stepper motor more easily. You do not need to control the steppers all the time anymore, simply send a command to I2C motor driver V1.3 to drive a stepper motor, and it will act as your command, which would save your Arduino resource and simplify your code.

Version
| Revision | Descriptions | Release |
|---|---|---|
| v1.0 | Initial public release | May 17th, 2012 |
| v1.2 | Modify the I2C address set by hardware | July 2nd, 2012 |
| v1.3 | Modify the firmware to support off-line Stepper | Feb 18th, 2013 |
Features
- Grove Compatible
- I2C Interface
- Adjustable motor speed and rotation direction
- Changeable slave address by hardware
More details about Grove modules please refer to [Grove System](https://wiki.seeedstudio.com/Grove_System/)
Specifications
| Item | Min | Typical | Max | Unit |
|---|---|---|---|---|
| Working Voltage | 6 | - | 15 | VDC |
| Max Output Current per channel | 0.5 | A | ||
| Maximum Total current | 1.0 | A | ||
| Input/output voltage on I2C bus | 5 | V | ||
| Communication protocol | I2C | / | ||
If you want to use multiplue I2C devices, please refer to [Software I2C](https://wiki.seeedstudio.com/Arduino_Software_I2C_user_guide/).
Platforms Supported
| Arduino | Raspberry Pi | |||
|---|---|---|---|---|
The platforms mentioned above as supported is/are an indication of the module's software or theoritical compatibility. We only provide software library or code examples for Arduino platform in most cases. It is not possible to provide software library / demo code for all possible MCU platforms. Hence, users have to write their own software library.
Hardware Overview
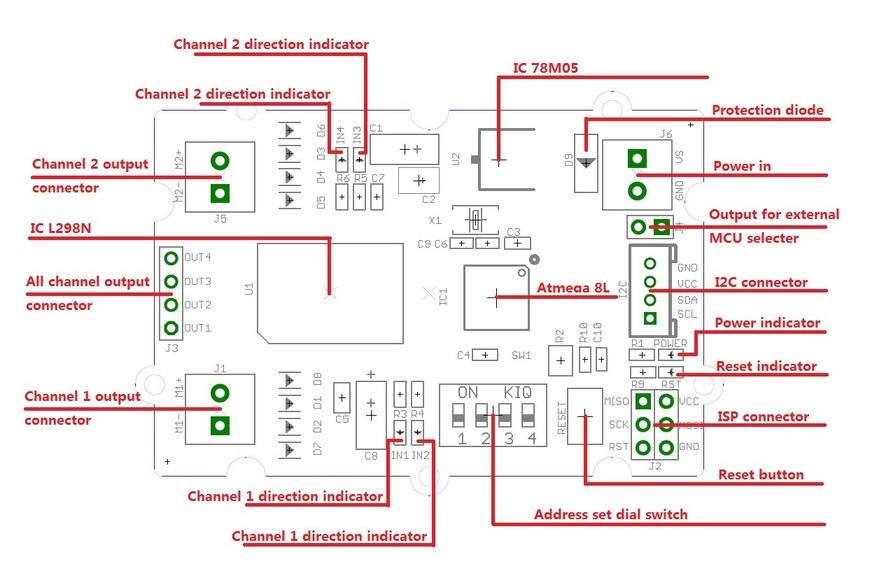
78M05 IC: 5V voltage regulator
L298 IC: Dual full bridge driver
ATmega8 IC: Control Motor Rotation.
Note
Input voltage on screw terminals is regulated to 5V and connected to I2C +5V via a jumper (J4). Remove jumper if both external power via the screw terminals and power via the I2C header are used. Use jumper if 5V should be supplied to the I2C bus.Application Ideas
- Robots
- Homebuilt RC cars
- Case fans
- High power LED illumination
Caution
The board will be very hot while operating over 1Amp. Do keep your hands off!Getting Started
If this is the first time you work with Arduino, we firmly recommend you to see [Getting Started with Arduino](https://wiki.seeedstudio.com/Getting_Started_with_Arduino/) before the start.
Play With Arduino
Demonstration
The I2C Motor Driver can control motor which is based on the chip L298. The L298 isn’t just a dual motor driver, it is a dual H-bridge. An h-bridge is basically a specific setup of transistors that allow you to switch direction of current. Hooking up to a motor means you can have it spin in both directions; and with PWM input, you can use your Arduino to make them spin at any speed. Because the L298 has 2 H-bridges, you can make a robot turn around by spinning each wheel in different directions, and of course go forwards and backwards.
Hardware
- Step 1. Prepare the below stuffs:
| Seeeduino V4.2 | Base Shield | Grove - I2C Motor Driver V1.3 |
|---|---|---|
 |  |  |
| Get One Now | Get One Now | Get One Now |
Step 2. Set the address of the I2C Motor Driver
Set the address by dial switch is a new function added to the new I2C Motor Driver.

- Then keep the address setup in the program the same as the address setup on the I2C motor driver. The default address setup in the program is 0x0f.
- Step 3. Connect Grove - I2C Motor Driver V1.3 to port I2C of Grove-Base Shield.
- Step 4. Plug Grove - Base Shield into Seeeduino.
- Step 5. Connect Seeeduino to PC via a USB cable.
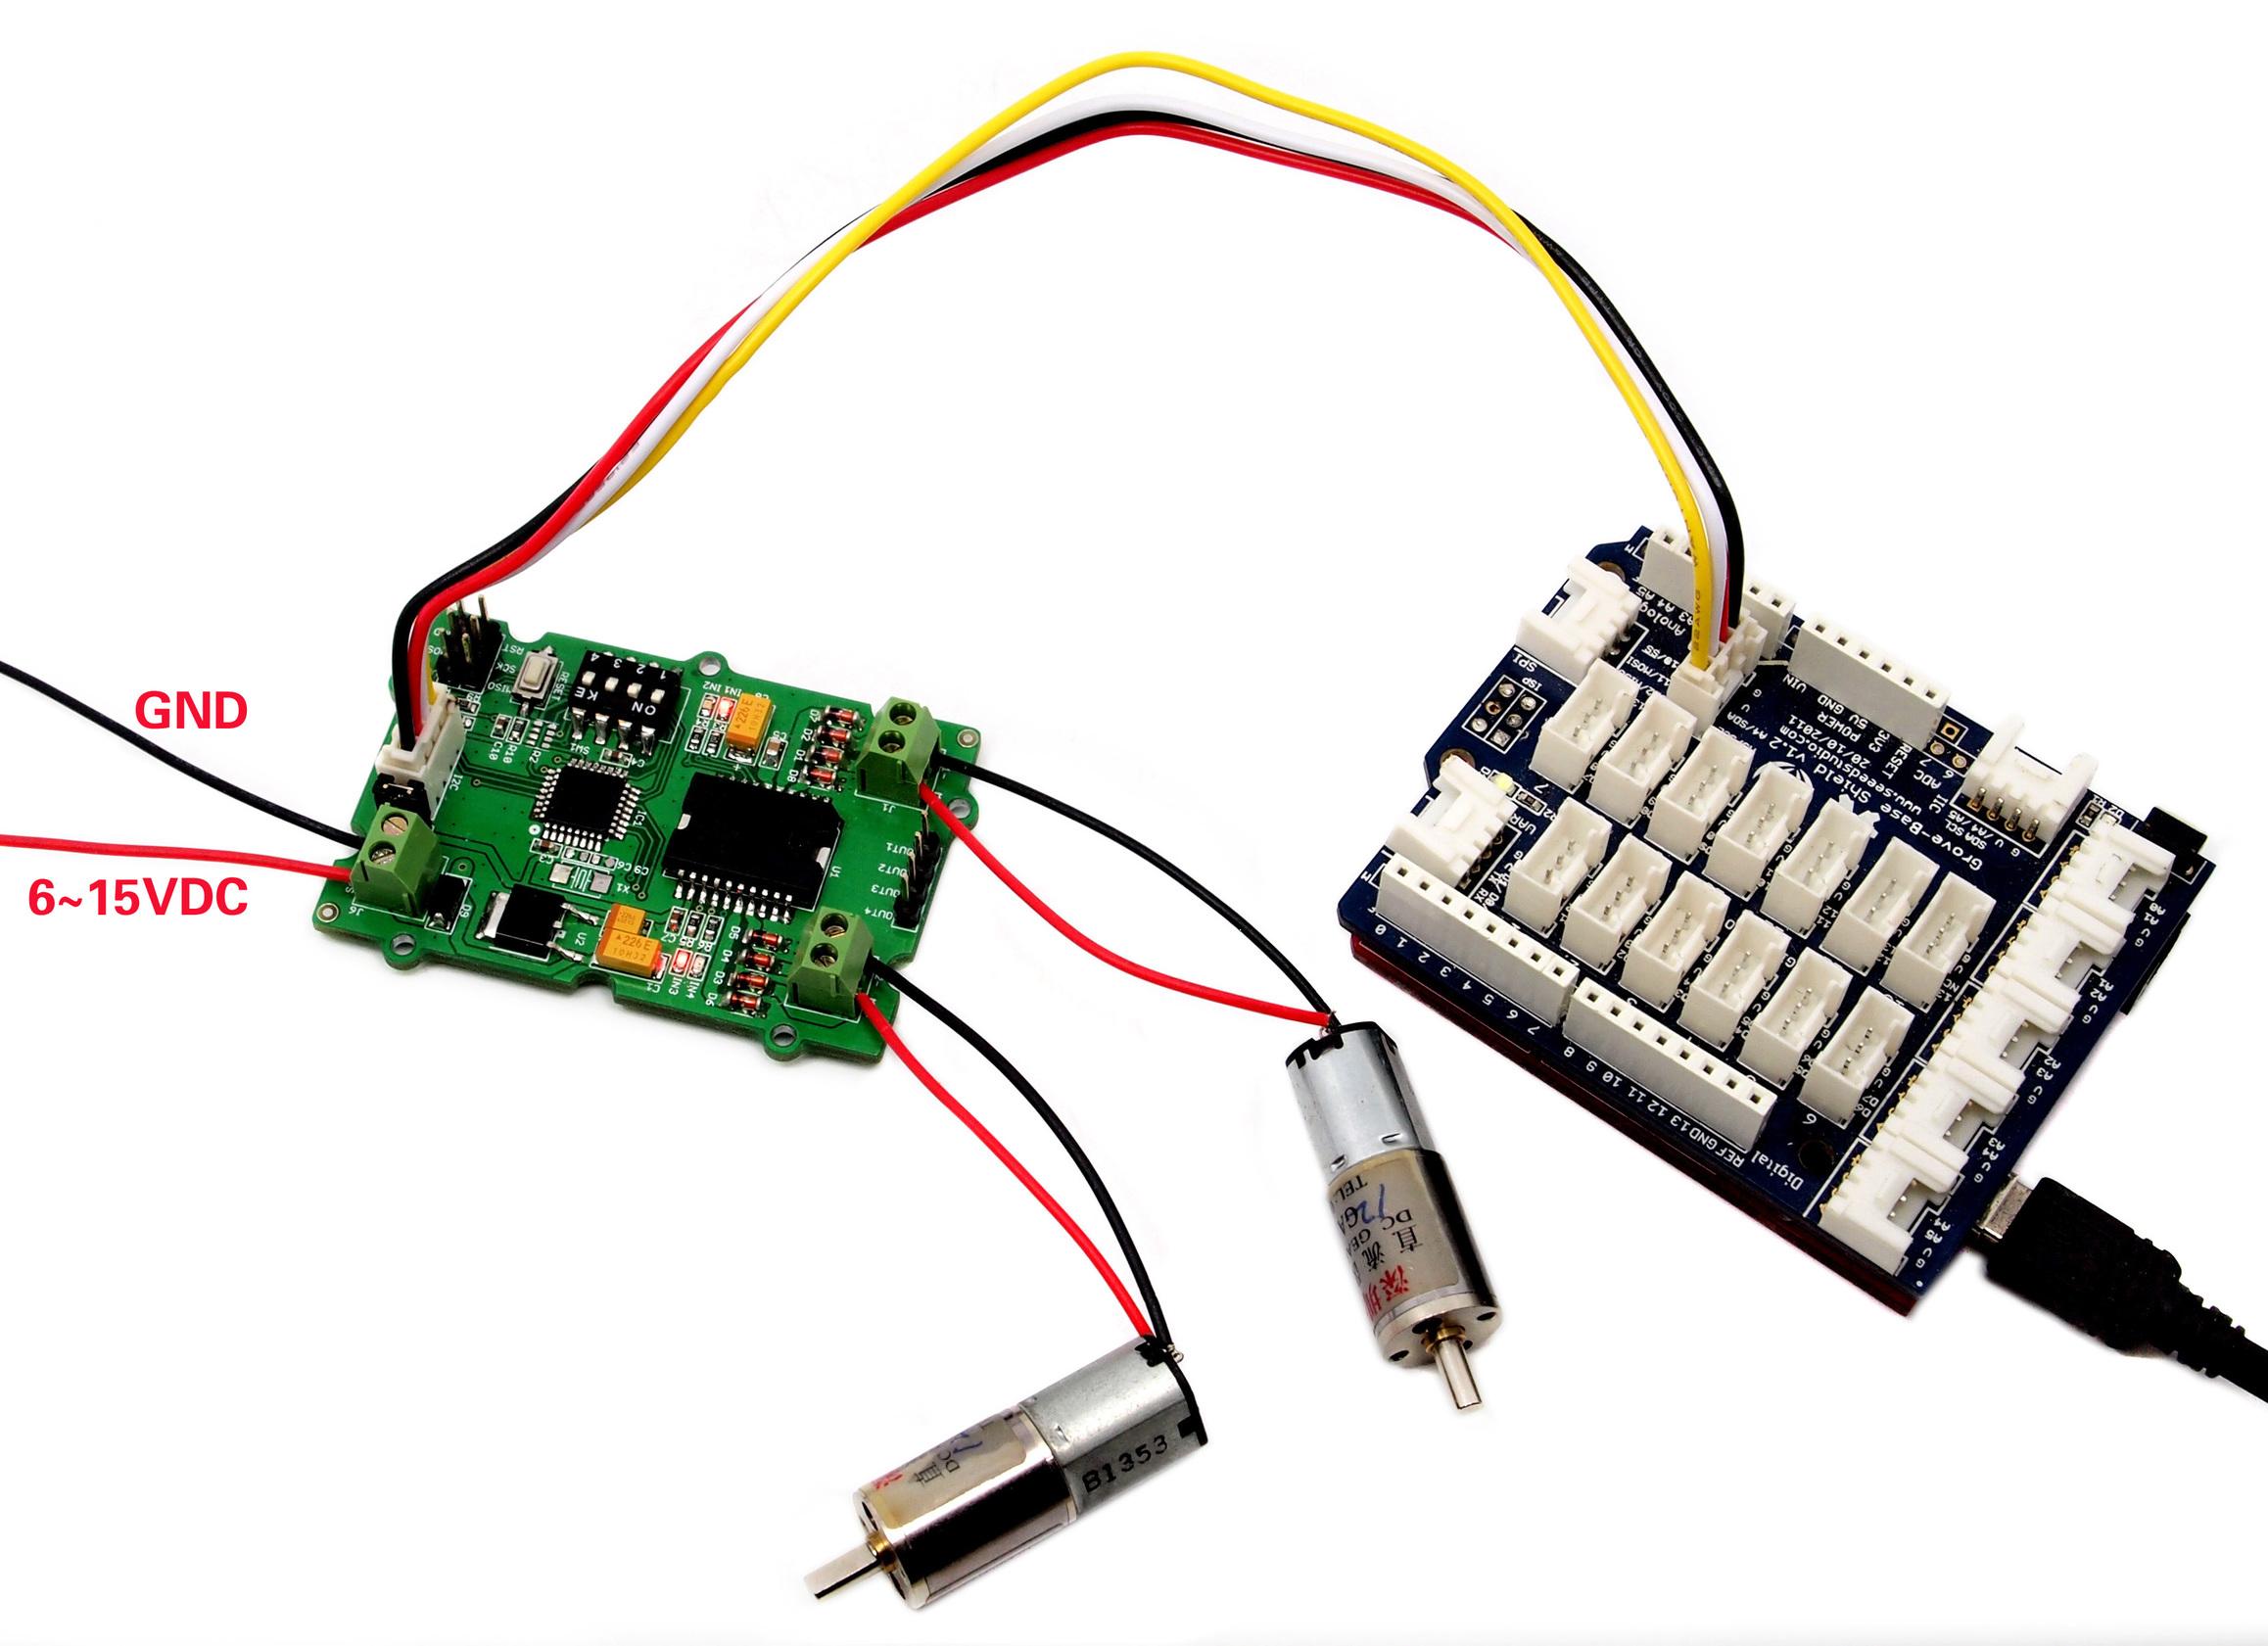
If we don't have Grove Base Shield, We also can directly connect Grove - I2C Motor Driver V1.3 to Seeeduino as below.
| Seeeduino | Grove - I2C Motor Driver V1.3 |
|---|---|
| 5V | Red |
| GND | Black |
| SDA | White |
| SCL | Yellow |
Software
- Step 1. Download the Grove_I2C_Motor_Driver_v1_3 Library from Github.
- Step 2. Refer How to install library to install library for Arduino.
- Step 3. Copy the code into Arduino IDE and upload. If you do not know how to upload the code, please check how to upload code.
// default I2C address is 0x0f
#define I2C_ADDRESS 0x0f

void setup()
{
    Motor.begin(I2C_ADDRESS);
}
Note
The first thing to notice, is that you need an external power source for your DC motors. The 5V pin on the Arduino cannot provide enough power to drive 2 motors, you may damage your Arduino if you do so.- There are 2 functions to control DC motors:
// Set the speed of a motor, speed is equal to duty cycle here
void speed(unsigned char motor_id, int _speed);

// Stop one motor
void stop(unsigned char motor_id);
With speed() function, you are able to drive one motor at the speed you want.
motor_id represents which motor to use. You can fill MOTOR1 or MOTOR2.
_speed represents the speed you set to the motor. You can fill -100~100 here. When _speed>0, DC motor runs clockwise, while_speed<0, DC motor runs anticlockwise. And the bigger the absolute value of _speed, the faster the speed of DC motor.
With stop() function, you are able to stop a running DC motor.
- motor_id represents which motor to use. You can fill MOTOR1 or MOTOR2.
Drive a Stepper Motor
Take 24BYJ48 Stepper Motor as an example, The hardware installation as shown below:
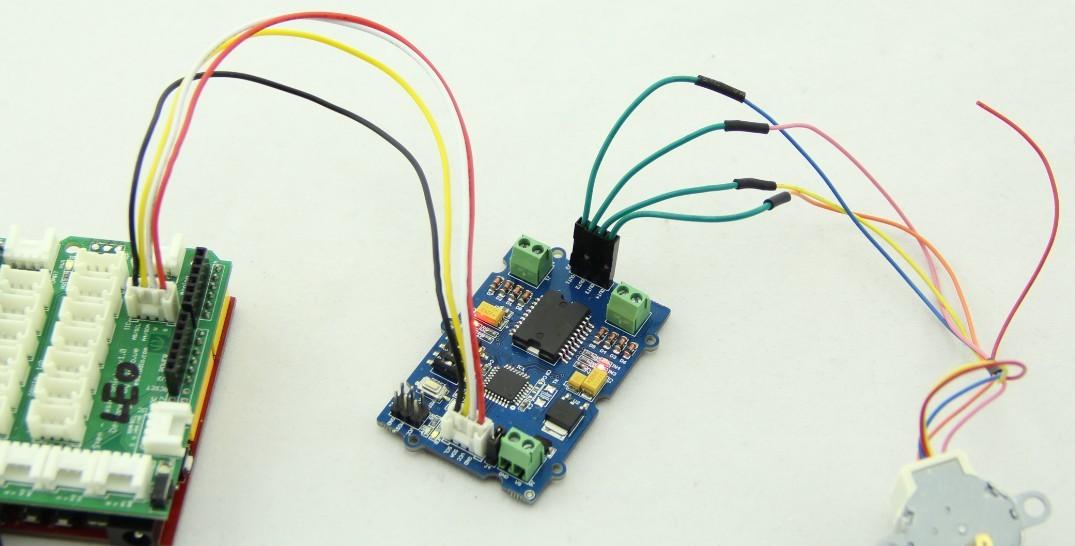
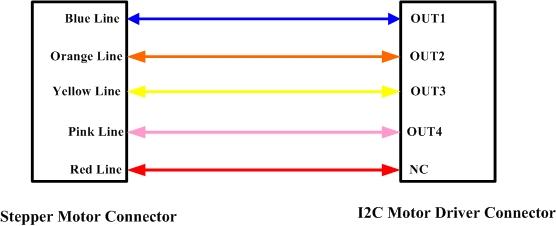
The connection between 24BYJ48 Stepper Motor and I2C Motor Driver is as shown below:
- We provide one function to drive a stepper motor.
// Drive a stepper motor
void StepperRun(int _step);
- _step represents the steps you set to the stepper motor to run. You can fill -1024~1024. When _step>0, stepper motor runs clockwise, while_step<0, stepper motor runs anticlockwise. When _step is 512/-512, the stepper motor will run a complete turn and if_step is 1024/-1024, the stepper motor will run 2 turns. The stepper motor will stop automatically after it finishes its steps.
Play with Codecraft
Hardware
Step 1. Using a Grove cable connect Grove - I2C Motor Driver to Seeeduino's I2C port. If you are using Arduino, please take advantage of a Base Shield.
Step 2. Link Seeedino/Arduino to your PC via an USB cable.
Software
Step 1. Open Codecraft, add Arduino support, and drag a main procedure to working area.
If this is your first time using Codecraft, see also [Guide for Codecraft using Arduino](https://wiki.seeedstudio.com/Guide_for_Codecraft_using_Arduino/).
Step 2. Drag blocks as picture below or open the cdc file which can be downloaded at the end of this page.

Upload the program to your Arduino/Seeeduino.
When the code finishes uploaded, you will see the DC motors which connected to Motor Driver are working.
Schematic Online Viewer
Resources
[Library] Grove - I2C Motor Driver V1.3 Library
[Firmware] On-Chip Firmware for I2C motor driver
[Datasheet] L298 Datasheet
[Datasheet] 78M05 Datasheet
[Codecraft] CDC File
Tech Support & Product Discussion
Thank you for choosing our products! We are here to provide you with different support to ensure that your experience with our products is as smooth as possible. We offer several communication channels to cater to different preferences and needs.