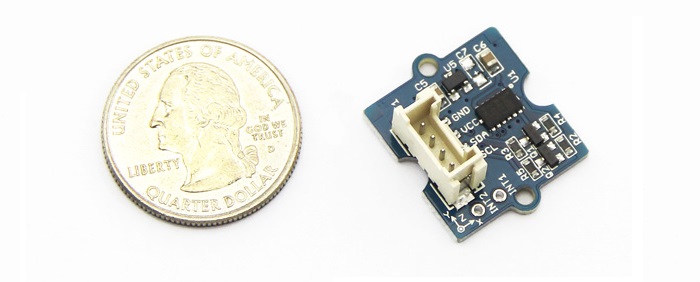
Grove - 3 Axis Digital Accelerometer(±16g)
3-Axis Digital Accelerometer is the key part in projects like orientation detection, gesture detection and Motion detection. This 3-Axis Digital Accelerometer(±16g) is based on low power consumption IC ADXL345. It features up to 10,000g high shock survivability and configurable Samples per Second rate. For generous applications that don't require too large measurement range, this is a great choice because it's durable, energy saving and cost-efficient.

Specifications
- Working voltage: 3.0 - 5.5V
- Test Range: ±16
- Sensitivity: 3.9mg / LSB
- Standby Current: 0.1μA(Under stand mode Vcc = 2.5 V (typical))
- 10000 g high shock survivability
- ECOPACK®RoHS and “Green” compliant
- Suli-compatible Library
- More details about Grove modules please refer to [Grove System](https://wiki.seeedstudio.com/Grove_System/)
Demonstration
With Arduino
Every accelerometer has been individually tested before shipping to you. But in rare cases, you might need to reset the zero-offset by yourself. Here below we show you how to read the raw data and obtain data in the unit of g, AKA g-force, from this accelerometer.

- Step1: Plug it onto the I2C port of your Grove - Base Shield.
- Step2: Download the Digital Accelerometer(±16g) Library .zip and unpack it into arduino-1.0\libraries in your Arduino installation folder. If you don't know how to install library for Arduino, please follow the toturial How to install an Arduino library
- Step3: If you have the library installed, Open the demo code directly by the path: File(文件) -> Example(示例) ->DigitalAccelerometer_ADXL345->ADXL345_demo_code.
- Step4: Upload the code and open the serial monitor(usually it is on the right up corner). Please refer to the toturial Upload code if you do not know how to upload.
- Step5: The result will be showed as the format in below image, shake the grove and you will find the number changing.
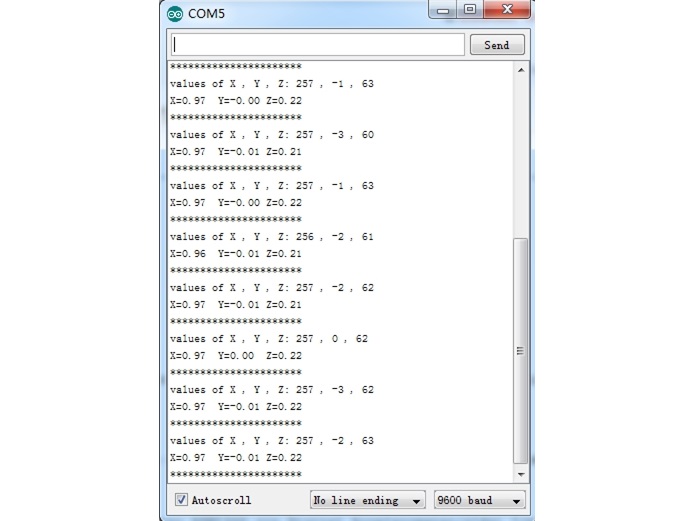
The outputs of this sensor consist of two parts: raw data and 3-axis acceleration info converted into the unit of gravity, "g".
Play with Codecraft
Hardware
Step 1. Using a Grove cable connect Grove - 3-Axis Digital Accelerometer(±16g) to Seeeduino's I2C port. If you are using Arduino, please take advantage of a Base Shield.
Step 2. Link Seeedino/Arduino to your PC via an USB cable.
Software
Step 1. Open Codecraft, add Arduino support, and drag a main procedure to working area.
If this is your first time using Codecraft, see also [Guide for Codecraft using Arduino](https://wiki.seeedstudio.com/Guide_for_Codecraft_using_Arduino/).
Step 2. Drag blocks as picture below or open the cdc file which can be downloaded at the end of this page.
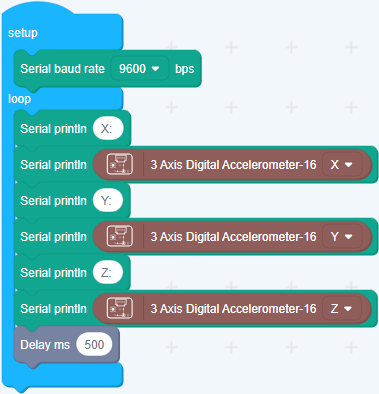
Upload the program to your Arduino/Seeeduino.
When the code finishes uploaded, you will see the acceleration displayed in the Serial Monitor.
With Raspberry Pi
Step1: You should have got a raspberry pi and a grovepi or grovepi+.
Step2: You should have completed configuring the development enviroment, otherwise follow here.

Step3: Connection
- Plug the sensor to grovepi socket i2c-x(1~3) by using a grove cable.
Step4: Navigate to the demos' directory:
cd yourpath/GrovePi/Software/Python/
To see the code
nano grovepi_tilt_switch.py # "Ctrl+x" to exit #
import smbus
from time import sleep

# select the correct i2c bus for this revision of Raspberry Pi
revision = ([l[12:-1] for l in open('/proc/cpuinfo','r').readlines() if l[:8]=="Revision"]+['0000'])[0]
bus = smbus.SMBus(1 if int(revision, 16) >= 4 else 0)

# ADXL345 constants
EARTH_GRAVITY_MS2   = 9.80665
SCALE_MULTIPLIER    = 0.004

DATA_FORMAT         = 0x31
BW_RATE             = 0x2C
POWER_CTL           = 0x2D

BW_RATE_1600HZ      = 0x0F
BW_RATE_800HZ       = 0x0E
BW_RATE_400HZ       = 0x0D
BW_RATE_200HZ       = 0x0C
BW_RATE_100HZ       = 0x0B
BW_RATE_50HZ        = 0x0A
BW_RATE_25HZ        = 0x09

RANGE_2G            = 0x00
RANGE_4G            = 0x01
RANGE_8G            = 0x02
RANGE_16G           = 0x03

MEASURE             = 0x08
AXES_DATA           = 0x32

class ADXL345:

    address = None

    def __init__(self, address = 0x53):
        self.address = address
        self.setBandwidthRate(BW_RATE_100HZ)
        self.setRange(RANGE_2G)
        self.enableMeasurement()

    def enableMeasurement(self):
        bus.write_byte_data(self.address, POWER_CTL, MEASURE)

    def setBandwidthRate(self, rate_flag):
        bus.write_byte_data(self.address, BW_RATE, rate_flag)

    # set the measurement range for 10-bit readings
    def setRange(self, range_flag):
        value = bus.read_byte_data(self.address, DATA_FORMAT)

        value &= ~0x0F;
        value |= range_flag;
        value |= 0x08;

        bus.write_byte_data(self.address, DATA_FORMAT, value)

    # returns the current reading from the sensor for each axis
    #
    # parameter gforce:
    #    False (default): result is returned in m/s^2
    #    True           : result is returned in gs
    def getAxes(self, gforce = False):
        bytes = bus.read_i2c_block_data(self.address, AXES_DATA, 6)

        x = bytes[0] | (bytes[1] << 8)
        if(x & (1 << 16 - 1)):
            x = x - (1<<16)

        y = bytes[2] | (bytes[3] << 8)
        if(y & (1 << 16 - 1)):
            y = y - (1<<16)

        z = bytes[4] | (bytes[5] << 8)
        if(z & (1 << 16 - 1)):
            z = z - (1<<16)

        x = x * SCALE_MULTIPLIER
        y = y * SCALE_MULTIPLIER
        z = z * SCALE_MULTIPLIER

        if gforce == False:
            x = x * EARTH_GRAVITY_MS2
            y = y * EARTH_GRAVITY_MS2
            z = z * EARTH_GRAVITY_MS2

        x = round(x, 4)
        y = round(y, 4)
        z = round(z, 4)

        return {"x": x, "y": y, "z": z}

if __name__ == "__main__":
    # if run directly we'll just create an instance of the class and output
    # the current readings
    adxl345 = ADXL345()

    axes = adxl345.getAxes(True)
    print "ADXL345 on address 0x%x:" % (adxl345.address)
    print "   x = %.3fG" % ( axes['x'] )
    print "   y = %.3fG" % ( axes['y'] )
    print "   z = %.3fG" % ( axes['z'] )
5.Run the demo.
sudo python grove_tilt_switch.py
With Beaglebone Green
To begin editing programs that live on BBG, you can use the Cloud9 IDE. As a simple exercise to become familiar with Cloud9 IDE, creating a simple application to blink one of the 4 user programmable LEDs on the BeagleBone is a good start.
If this is your first time to use Cloud9 IDE, please follow this link.
Step1: Set the Grove - UART socket as a Grove - GPIO Socket, just follow this link.
Step2: Click the "+" in the top-right to create a new file.
Step3: Copy and paste the following code into the new tab.
import smbus
import time

bus = smbus.SMBus(1)

# ADXL345 device address
ADXL345_DEVICE = 0x53

# ADXL345 constants
EARTH_GRAVITY_MS2   = 9.80665
SCALE_MULTIPLIER    = 0.004

DATA_FORMAT         = 0x31
BW_RATE             = 0x2C
POWER_CTL           = 0x2D

BW_RATE_1600HZ      = 0x0F
BW_RATE_800HZ       = 0x0E
BW_RATE_400HZ       = 0x0D
BW_RATE_200HZ       = 0x0C
BW_RATE_100HZ       = 0x0B
BW_RATE_50HZ        = 0x0A
BW_RATE_25HZ        = 0x09

RANGE_2G            = 0x00
RANGE_4G            = 0x01
RANGE_8G            = 0x02
RANGE_16G           = 0x03

MEASURE             = 0x08
AXES_DATA           = 0x32

class ADXL345:

    address = None

    def __init__(self, address = ADXL345_DEVICE):
        self.address = address
        self.setBandwidthRate(BW_RATE_100HZ)
        self.setRange(RANGE_2G)
        self.enableMeasurement()

    def enableMeasurement(self):
        bus.write_byte_data(self.address, POWER_CTL, MEASURE)

    def setBandwidthRate(self, rate_flag):
        bus.write_byte_data(self.address, BW_RATE, rate_flag)

    # set the measurement range for 10-bit readings
    def setRange(self, range_flag):
        value = bus.read_byte_data(self.address, DATA_FORMAT)

        value &= ~0x0F;
        value |= range_flag;
        value |= 0x08;

        bus.write_byte_data(self.address, DATA_FORMAT, value)

    # returns the current reading from the sensor for each axis
    #
    # parameter gforce:
    #    False (default): result is returned in m/s^2
    #    True           : result is returned in gs
    def getAxes(self, gforce = False):
        bytes = bus.read_i2c_block_data(self.address, AXES_DATA, 6)

        x = bytes[0] | (bytes[1] << 8)
        if(x & (1 << 16 - 1)):
            x = x - (1<<16)

        y = bytes[2] | (bytes[3] << 8)
        if(y & (1 << 16 - 1)):
            y = y - (1<<16)

        z = bytes[4] | (bytes[5] << 8)
        if(z & (1 << 16 - 1)):
            z = z - (1<<16)

        x = x * SCALE_MULTIPLIER
        y = y * SCALE_MULTIPLIER
        z = z * SCALE_MULTIPLIER

        if gforce == False:
            x = x * EARTH_GRAVITY_MS2
            y = y * EARTH_GRAVITY_MS2
            z = z * EARTH_GRAVITY_MS2

        x = round(x, 4)
        y = round(y, 4)
        z = round(z, 4)

        return {"x": x, "y": y, "z": z}

if __name__ == "__main__":
    # if run directly we'll just create an instance of the class and output
    # the current readings
    adxl345 = ADXL345()

    while True:
        axes = adxl345.getAxes(True)
        print "ADXL345 on address 0x%x:" % (adxl345.address)
        print "   x = %.3fG" % ( axes['x'] )
        print "   y = %.3fG" % ( axes['y'] )
        print "   z = %.3fG" % ( axes['z'] )
        time.sleep(2)
Step4: Save the file by clicking the disk icon with with the .py extension..
Step5: Connect Grove - 3-Axis Digital Accelerometer(±16g) to Grove I2C socket on BBG.
Step6: Run the code. You'll sfind that the terminal outputs Gravity info every 2 seconds.
Schematic Online Viewer
Resources
- Eagle file.zip
- Suli-compatible Library
- ADXL345 datasheet.pdf
- github repository for 3-Axis Digital Accelerometer(±16g)
- Grove - 3-Axis Digital Accelerometer(±16g)
- Codecraft CDC File
Projects
Grove - Introduction in 3-Axis Digital Accelerometer: How to use a 3-axis digital accelerometer.
Tech Support & Product Discussion
Thank you for choosing our products! We are here to provide you with different support to ensure that your experience with our products is as smooth as possible. We offer several communication channels to cater to different preferences and needs.