Image Classification
Here we are going to build a tinyML project with XIAO ESPS3-Sense to classify Dog and Cat in photo. Let's get started.
How it's working.
We are running the machine learning model on our XIAO and feeding camera stream to it. Then the XIAO inference the result and predict with the help on onboard neiral network we implimented on. Let's build one.

Things needed
- XIAO ESP32-Sense
- <32GB MicroSD card
- Type-C Cable
- Arduino IDE
- Edgeimpulse Account
Step 1. Collecting the Cat and Dog Image
First step of machine learning project is to collect the dataset and here we need to collect Dog and Cat images. Here, We can collect the image in two methods.
- Collect Images direclty from the XIAO-ESPS3 Sense and Save to SD card the upload to the EdgeImpulse
- Direclty Collect the image via mobile phone, internet or open dataset then uploaded to the Edgeimpulse.
1.1 Method 1: Collect Images via XIAO-ESP32S3 Sense
Here we are collecting images using sense camera module and saving to the SD card, then later we will upload to the EdgeImpulse.
1.1.1 Connect Camera
If you are shopping for the XIAO ESP32S3 Sense, then you should also include an expansion board. This expansion board has a 1600*1200 OV2640 camera sensor, Onboard SD Card Slot and digital microphone.
By installing the expansion board with XIAO ESP32S3 Sense, you can use the functions on the expansion board.
Installing the expansion board is very simple, you just need to align the connector on the expansion board with the B2B connector on the XIAO ESP32S3, press it hard and hear a "click", the installation is complete.
We now have a new fully XIAO ESP32S3 Sense-compatible powerful camera, the OV5640, on our shelves, and if you purchase it, you can replace the camera to use it.
- Step 1. Download and Install the stable version of Arduino IDE according to your operating system.
1.1.2 Install XIAO-ESP32S3 Sense on Arduino.
Step 1. Add ESP32 board package to your Arduino IDE.
Navigate to File > Preferences, and fill "Additional Boards Manager URLs" with the url below: https://raw.githubusercontent.com/espressif/arduino-esp32/gh-pages/package_esp32_index.json

Navigate to Tools > Board > Boards Manager..., type the keyword esp32 in the search box, select the latest version of esp32, and install it.
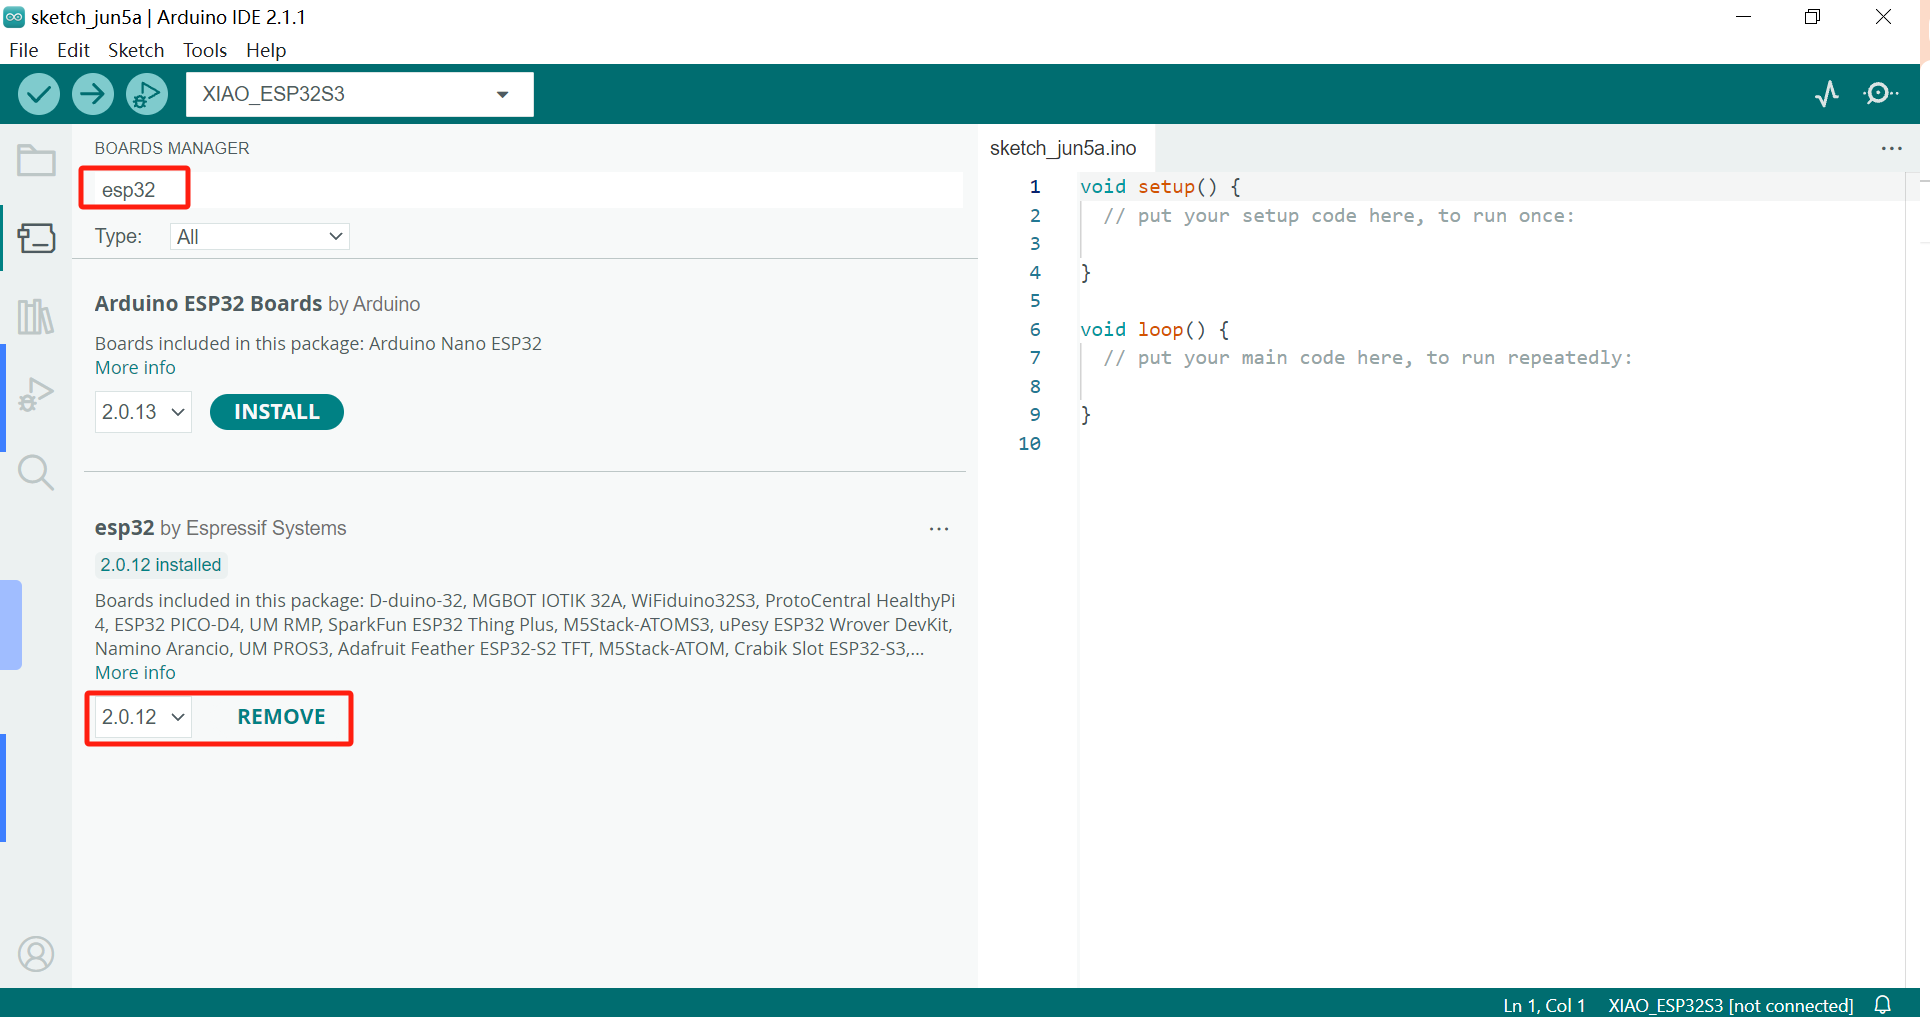
The on-board package for XIAO ESP32S3 requires at least version 2.0.8 to be available.
- Step 2. Select your board and port.
On top of the Arduino IDE, you can select the port directly. This is likely to be COM3 or higher (COM1 and COM2 are usually reserved for hardware serial ports).
Also, search for xiao in the development board on the left. select XIAO_ESP32S3.
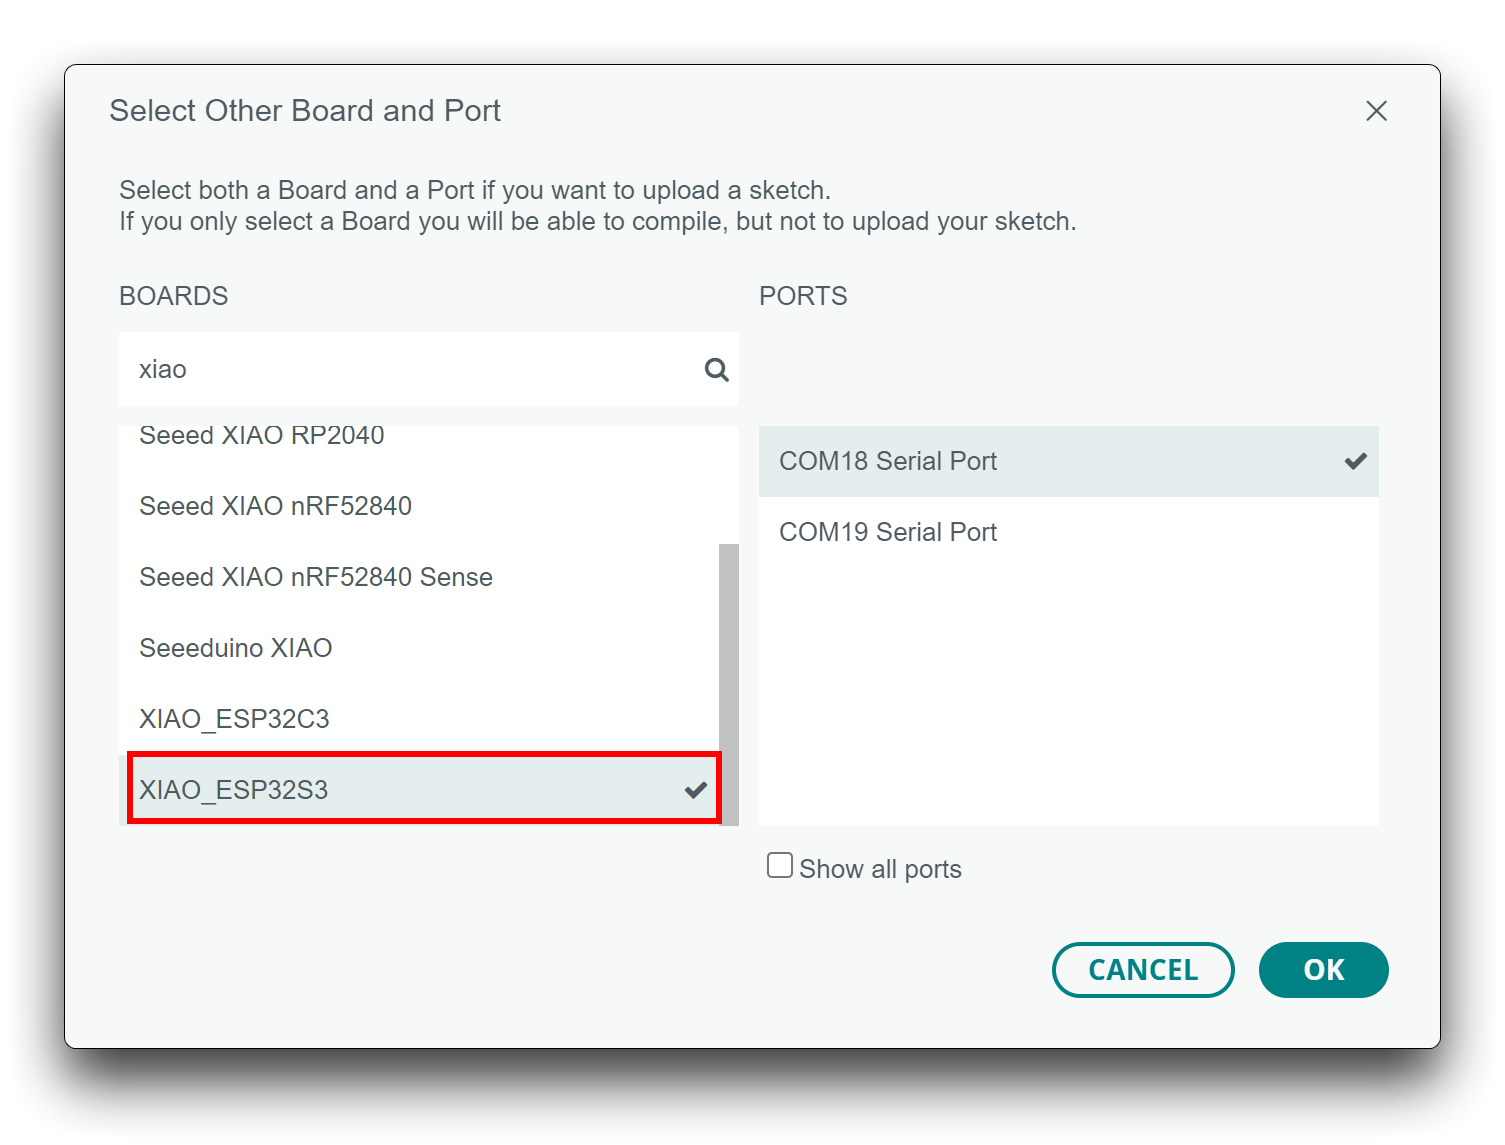
With this preparation, you can start writing programs for XIAO ESP32S3 to compile and upload.
1.2 Upload sketch that can take image and save to SD Card.
Download the sketch file from here, and unzip in your computer and click on the "take_photos_command.ino" to open the sketch. Then select correct port and board for XIAO for upload.

While taking photos, make sure to point to the image or object we need to collect as dataset.

Since, it's a image classification we need to collect as many image to make system more stable. So collect more cute dog and cat images.
1.2 Method 2: Upload images to the EdgeImpulse Direclty.
For this method, we need to collect images from internet or via phone. Luckly, we have service like Kaggle to provide us dataset for Dog and Cat images, please see here.
Once you collected the dataset, Open your EdgeImpulse project and Goto Data acquisition and select + Add data and then choose Upload data option.
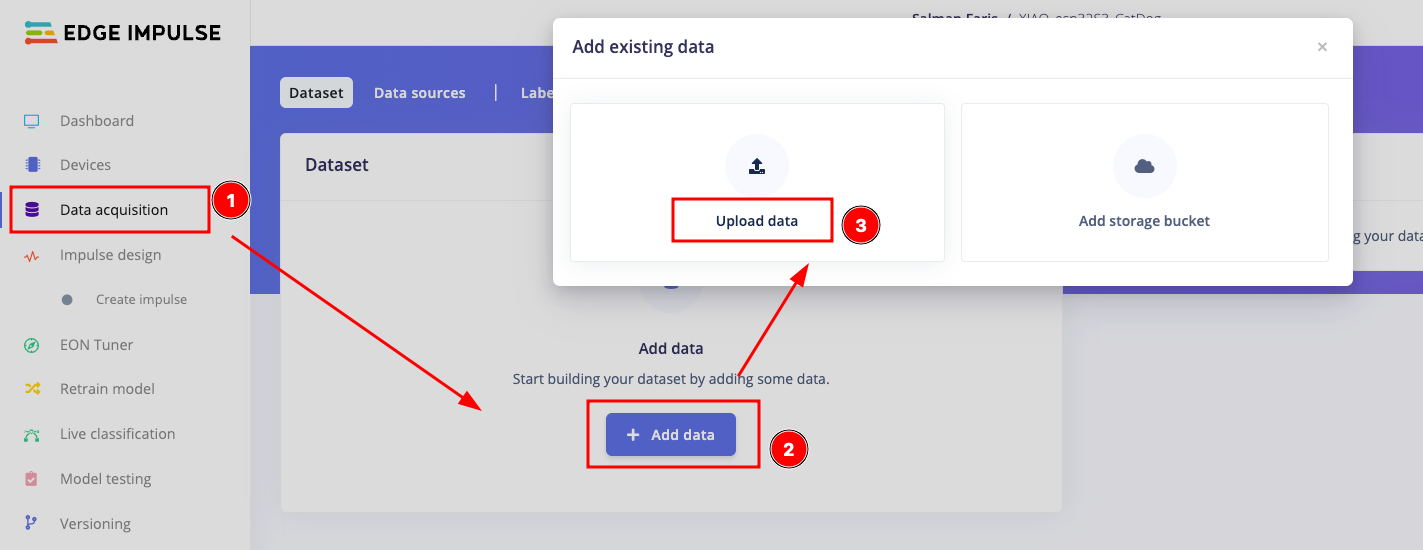
From the page, Select uplaod modes as "Select a folder", the select the files from the below option. Makesure to select the "Automaticlly split between training and testing" and Label as "Infer from file name"

Once you uploaded done, you can see the window as below.

Step 2. Design Impulse and Training our Neural Network
After collecting data for your project, you can now create your Impulse. A complete Impulse will consist of 3 main building blocks: input block, processing block and a learning block.
- To design an impulse, Select Create an impulse under the Impulse design.
- Input block : The input block indicates the type of input data you are training your model with. This can be time series (audio, vibration, movements) or images. Here we select the Image data as Inputblock
- Processing blocks: A processing block is basically a feature extractor. It consists of DSP (Digital Signal Processing) operations that are used to extract features that our model learns on. These operations vary depending on the type of data used in your project. Here we are using EdgeImpulse pre-build image as processing block.
- Learning blocks : After adding your processing block, it is now time to add a learning block to make your impulse complete. A learning block is simply a neural network that is trained to learn on your data. Here we are using Transfer Learning (Images) it will fine tune a pre-trained image classification model on your data. Good performance even with relatively small image datasets.
- After Designing the impulse, click on save impulse to continue.

Step 2.1: Feature extraction using processing block.
Here we will use DSP (Digital Signal Processing) operations that are used to extract features that our model learns on. These operations vary depending on the type of data used in your project. First we need set the parameters as below mentioned.

Once we set the parameters, we need to generate the features, click generate features to start the operation.

Once we generate the features, We need to configure the neural network that is trained to learn on your data. Here we are using Transfer Learning (Images) it will fine tune a pre-trained image classification model on your data. Good performance even with relatively small image datasets. Select the neural network as mentioned below and click Start Training. It will take some time and you need wait.

Once the training is done, we are ready to download our tinyML libray that created. Go to the Deployment option and select Arduino library are deployment and click Build to generate the library.

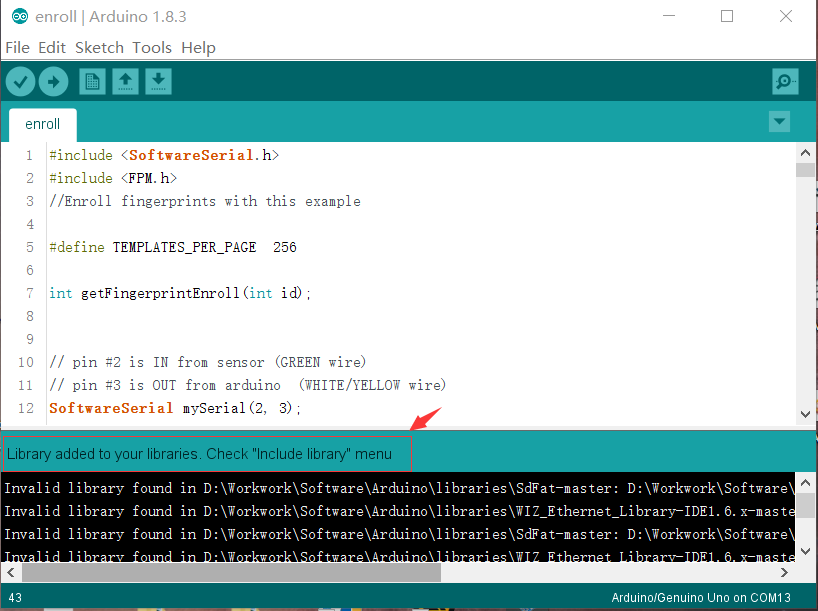
The library will be downloaded automatically. And After that, add that to the arduino IDE. open your Arduino IDE, click on Sketch > Include Library > Add .ZIP Library.

Choose the zip file you just downloaded,and if the library install correct, you will see Library added to your libraries in the notice window. Which means the library is installed successfully.
Step 3. Run the example sketch
Even though Edge Impulse has not released its SDK for ESP32S3 using the ESP NN accelerator, thanks to Dmitry Maslov, we can have its assembly optimizations restored and fixed for ESP32-S3. This solution is not official yet, and EI will include it in EI SDK once they fix conflicts with other boards.
For now, this only works with the non-EON version. So, you should also keep the the option Enable EON Compiler not selected.
When the Build button is selected, a Zip file will be created and downloaded to your computer.
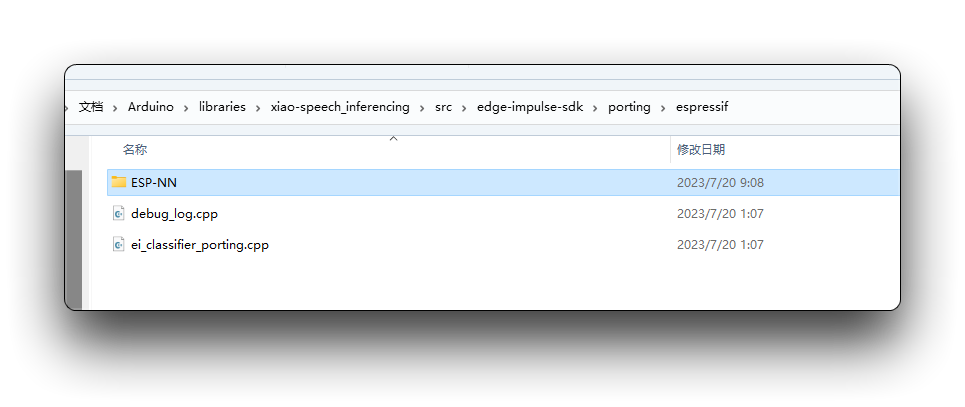
Before we use the downloaded library, we need to enable the ESP NN Accelerator. For that, you can download a preliminary version from the project GitHub, unzip it, and replace the ESP NN folder with it under:src/edge-impulse-sdk/porting/espressif/ESP-NN, in your Arduino library folder.
Copy the below inference code and paste to your Arduino IDE.
/* Edge Impulse Arduino examples
 * Copyright (c) 2022 EdgeImpulse Inc.
 *
 * Permission is hereby granted, free of charge, to any person obtaining a copy
 * of this software and associated documentation files (the "Software"), to deal
 * in the Software without restriction, including without limitation the rights
 * to use, copy, modify, merge, publish, distribute, sublicense, and/or sell
 * copies of the Software, and to permit persons to whom the Software is
 * furnished to do so, subject to the following conditions:
 *
 * The above copyright notice and this permission notice shall be included in
 * all copies or substantial portions of the Software.
 *
 * THE SOFTWARE IS PROVIDED "AS IS", WITHOUT WARRANTY OF ANY KIND, EXPRESS OR
 * IMPLIED, INCLUDING BUT NOT LIMITED TO THE WARRANTIES OF MERCHANTABILITY,
 * FITNESS FOR A PARTICULAR PURPOSE AND NONINFRINGEMENT. IN NO EVENT SHALL THE
 * AUTHORS OR COPYRIGHT HOLDERS BE LIABLE FOR ANY CLAIM, DAMAGES OR OTHER
 * LIABILITY, WHETHER IN AN ACTION OF CONTRACT, TORT OR OTHERWISE, ARISING FROM,
 * OUT OF OR IN CONNECTION WITH THE SOFTWARE OR THE USE OR OTHER DEALINGS IN THE
 * SOFTWARE.
 */

/* Includes ---------------------------------------------------------------- */
#include <XIAO_esp32S3_CatDog2_inferencing.h>
#include "edge-impulse-sdk/dsp/image/image.hpp"

#include "esp_camera.h"

// Select camera model - find more camera models in camera_pins.h file here
// https://github.com/espressif/arduino-esp32/blob/master/libraries/ESP32/examples/Camera/CameraWebServer/camera_pins.h

#define CAMERA_MODEL_XIAO_ESP32S3 // Has PSRAM

#define PWDN_GPIO_NUM     -1
#define RESET_GPIO_NUM    -1
#define XCLK_GPIO_NUM     10
#define SIOD_GPIO_NUM     40
#define SIOC_GPIO_NUM     39

#define Y9_GPIO_NUM       48
#define Y8_GPIO_NUM       11
#define Y7_GPIO_NUM       12
#define Y6_GPIO_NUM       14
#define Y5_GPIO_NUM       16
#define Y4_GPIO_NUM       18
#define Y3_GPIO_NUM       17
#define Y2_GPIO_NUM       15
#define VSYNC_GPIO_NUM    38
#define HREF_GPIO_NUM     47
#define PCLK_GPIO_NUM     13

#define LED_GPIO_NUM      21


/* Constant defines -------------------------------------------------------- */
#define EI_CAMERA_RAW_FRAME_BUFFER_COLS           320
#define EI_CAMERA_RAW_FRAME_BUFFER_ROWS           240
#define EI_CAMERA_FRAME_BYTE_SIZE                 3

/* Private variables ------------------------------------------------------- */
static bool debug_nn = false; // Set this to true to see e.g. features generated from the raw signal
static bool is_initialised = false;
uint8_t *snapshot_buf; //points to the output of the capture

static camera_config_t camera_config = {
    .pin_pwdn = PWDN_GPIO_NUM,
    .pin_reset = RESET_GPIO_NUM,
    .pin_xclk = XCLK_GPIO_NUM,
    .pin_sscb_sda = SIOD_GPIO_NUM,
    .pin_sscb_scl = SIOC_GPIO_NUM,

    .pin_d7 = Y9_GPIO_NUM,
    .pin_d6 = Y8_GPIO_NUM,
    .pin_d5 = Y7_GPIO_NUM,
    .pin_d4 = Y6_GPIO_NUM,
    .pin_d3 = Y5_GPIO_NUM,
    .pin_d2 = Y4_GPIO_NUM,
    .pin_d1 = Y3_GPIO_NUM,
    .pin_d0 = Y2_GPIO_NUM,
    .pin_vsync = VSYNC_GPIO_NUM,
    .pin_href = HREF_GPIO_NUM,
    .pin_pclk = PCLK_GPIO_NUM,

    //XCLK 20MHz or 10MHz for OV2640 double FPS (Experimental)
    .xclk_freq_hz = 20000000,
    .ledc_timer = LEDC_TIMER_0,
    .ledc_channel = LEDC_CHANNEL_0,

    .pixel_format = PIXFORMAT_JPEG, //YUV422,GRAYSCALE,RGB565,JPEG
    .frame_size = FRAMESIZE_QVGA,    //QQVGA-UXGA Do not use sizes above QVGA when not JPEG

    .jpeg_quality = 12, //0-63 lower number means higher quality
    .fb_count = 1,       //if more than one, i2s runs in continuous mode. Use only with JPEG
    .fb_location = CAMERA_FB_IN_PSRAM,
    .grab_mode = CAMERA_GRAB_WHEN_EMPTY,
};

/* Function definitions ------------------------------------------------------- */
bool ei_camera_init(void);
void ei_camera_deinit(void);
bool ei_camera_capture(uint32_t img_width, uint32_t img_height, uint8_t *out_buf) ;

/**
* @brief      Arduino setup function
*/
void setup()
{
    // put your setup code here, to run once:
    Serial.begin(115200);
    //comment out the below line to start inference immediately after upload
    while (!Serial);
    Serial.println("Edge Impulse Inferencing Demo");
    if (ei_camera_init() == false) {
        ei_printf("Failed to initialize Camera!\r\n");
    }
    else {
        ei_printf("Camera initialized\r\n");
    }

    ei_printf("\nStarting continious inference in 2 seconds...\n");
    ei_sleep(2000);
}

/**
* @brief      Get data and run inferencing
*
* @param[in]  debug  Get debug info if true
*/
void loop()
{

    // instead of wait_ms, we'll wait on the signal, this allows threads to cancel us...
    if (ei_sleep(5) != EI_IMPULSE_OK) {
        return;
    }

    snapshot_buf = (uint8_t*)malloc(EI_CAMERA_RAW_FRAME_BUFFER_COLS * EI_CAMERA_RAW_FRAME_BUFFER_ROWS * EI_CAMERA_FRAME_BYTE_SIZE);

    // check if allocation was successful
    if(snapshot_buf == nullptr) {
        ei_printf("ERR: Failed to allocate snapshot buffer!\n");
        return;
    }

    ei::signal_t signal;
    signal.total_length = EI_CLASSIFIER_INPUT_WIDTH * EI_CLASSIFIER_INPUT_HEIGHT;
    signal.get_data = &ei_camera_get_data;

    if (ei_camera_capture((size_t)EI_CLASSIFIER_INPUT_WIDTH, (size_t)EI_CLASSIFIER_INPUT_HEIGHT, snapshot_buf) == false) {
        ei_printf("Failed to capture image\r\n");
        free(snapshot_buf);
        return;
    }

    // Run the classifier
    ei_impulse_result_t result = { 0 };

    EI_IMPULSE_ERROR err = run_classifier(&signal, &result, debug_nn);
    if (err != EI_IMPULSE_OK) {
        ei_printf("ERR: Failed to run classifier (%d)\n", err);
        return;
    }

    // print the predictions
    ei_printf("Predictions (DSP: %d ms., Classification: %d ms., Anomaly: %d ms.): \n",
                result.timing.dsp, result.timing.classification, result.timing.anomaly);

#if EI_CLASSIFIER_OBJECT_DETECTION == 1
    bool bb_found = result.bounding_boxes[0].value > 0;
    for (size_t ix = 0; ix < result.bounding_boxes_count; ix++) {
        auto bb = result.bounding_boxes[ix];
        if (bb.value == 0) {
            continue;
        }
        ei_printf("    %s (%f) [ x: %u, y: %u, width: %u, height: %u ]\n", bb.label, bb.value, bb.x, bb.y, bb.width, bb.height);
    }
    if (!bb_found) {
        ei_printf("    No objects found\n");
    }
#else
    for (size_t ix = 0; ix < EI_CLASSIFIER_LABEL_COUNT; ix++) {
        ei_printf("    %s: %.5f\n", result.classification[ix].label,
                                    result.classification[ix].value);
    }
#endif

#if EI_CLASSIFIER_HAS_ANOMALY == 1
        ei_printf("    anomaly score: %.3f\n", result.anomaly);
#endif


    free(snapshot_buf);

}

/**
 * @brief   Setup image sensor & start streaming
 *
 * @retval  false if initialisation failed
 */
bool ei_camera_init(void) {

    if (is_initialised) return true;

#if defined(CAMERA_MODEL_ESP_EYE)
  pinMode(13, INPUT_PULLUP);
  pinMode(14, INPUT_PULLUP);
#endif

    //initialize the camera
    esp_err_t err = esp_camera_init(&camera_config);
    if (err != ESP_OK) {
      Serial.printf("Camera init failed with error 0x%x\n", err);
      return false;
    }

    sensor_t * s = esp_camera_sensor_get();
    // initial sensors are flipped vertically and colors are a bit saturated
    if (s->id.PID == OV3660_PID) {
      s->set_vflip(s, 1); // flip it back
      s->set_brightness(s, 1); // up the brightness just a bit
      s->set_saturation(s, 0); // lower the saturation
    }

#if defined(CAMERA_MODEL_M5STACK_WIDE)
    s->set_vflip(s, 1);
    s->set_hmirror(s, 1);
#elif defined(CAMERA_MODEL_ESP_EYE)
    s->set_vflip(s, 1);
    s->set_hmirror(s, 1);
    s->set_awb_gain(s, 1);
#endif

    is_initialised = true;
    return true;
}

/**
 * @brief      Stop streaming of sensor data
 */
void ei_camera_deinit(void) {

    //deinitialize the camera
    esp_err_t err = esp_camera_deinit();

    if (err != ESP_OK)
    {
        ei_printf("Camera deinit failed\n");
        return;
    }

    is_initialised = false;
    return;
}


/**
 * @brief      Capture, rescale and crop image
 *
 * @param[in]  img_width     width of output image
 * @param[in]  img_height    height of output image
 * @param[in]  out_buf       pointer to store output image, NULL may be used
 *                           if ei_camera_frame_buffer is to be used for capture and resize/cropping.
 *
 * @retval     false if not initialised, image captured, rescaled or cropped failed
 *
 */
bool ei_camera_capture(uint32_t img_width, uint32_t img_height, uint8_t *out_buf) {
    bool do_resize = false;

    if (!is_initialised) {
        ei_printf("ERR: Camera is not initialized\r\n");
        return false;
    }

    camera_fb_t *fb = esp_camera_fb_get();

    if (!fb) {
        ei_printf("Camera capture failed\n");
        return false;
    }

   bool converted = fmt2rgb888(fb->buf, fb->len, PIXFORMAT_JPEG, snapshot_buf);

   esp_camera_fb_return(fb);

   if(!converted){
       ei_printf("Conversion failed\n");
       return false;
   }

    if ((img_width != EI_CAMERA_RAW_FRAME_BUFFER_COLS)
        || (img_height != EI_CAMERA_RAW_FRAME_BUFFER_ROWS)) {
        do_resize = true;
    }

    if (do_resize) {
        ei::image::processing::crop_and_interpolate_rgb888(
        out_buf,
        EI_CAMERA_RAW_FRAME_BUFFER_COLS,
        EI_CAMERA_RAW_FRAME_BUFFER_ROWS,
        out_buf,
        img_width,
        img_height);
    }


    return true;
}

static int ei_camera_get_data(size_t offset, size_t length, float *out_ptr)
{
    // we already have a RGB888 buffer, so recalculate offset into pixel index
    size_t pixel_ix = offset * 3;
    size_t pixels_left = length;
    size_t out_ptr_ix = 0;

    while (pixels_left != 0) {
        out_ptr[out_ptr_ix] = (snapshot_buf[pixel_ix] << 16) + (snapshot_buf[pixel_ix + 1] << 8) + snapshot_buf[pixel_ix + 2];

        // go to the next pixel
        out_ptr_ix++;
        pixel_ix+=3;
        pixels_left--;
    }
    // and done!
    return 0;
}

#if !defined(EI_CLASSIFIER_SENSOR) || EI_CLASSIFIER_SENSOR != EI_CLASSIFIER_SENSOR_CAMERA
#error "Invalid model for current sensor"
#endif
Makesure to replace the "#include <XIAO_esp32S3_CatDog2_inferencing.h>" with the library you genenrated. The upload the code and point to the Cat or Dog images or actual once, we can see the results Serial monitor.
Congrats to you 🙌 on completing the tinyML image classification project.
Resources
[PDF] ESP32-S3 Datasheet
For Seeed Studio XIAO ESP32S3
For Seeed Studio XIAO ESP32S3 Sense
[DXF] Seeed Studio XIAO ESP32S3 Sense Dimension in DXF (top)
[DXF] Seeed Studio XIAO ESP32S3 Sense Dimension in DXF (bottom)
Other
The remaining open source material is being compiled, so stay tuned!
Tech Support & Product Discussion
Thank you for choosing our products! We are here to provide you with different support to ensure that your experience with our products is as smooth as possible. We offer several communication channels to cater to different preferences and needs.