Edgeimpulse
Edge Impulse
Edge Impulse is the leading development platform for machine learning on edge devices, free for developers, and trusted by enterprises worldwide.
- With Edge Impulse, software developers, engineers, and domain experts can solve real problems using machine learning on edge devices without a Ph.D. or advanced embedded engineering skills. From getting started to MLOps in production, Edge Impulse provides maximum efficiency and speed on a wide range of hardware from MCUs to CPUs.
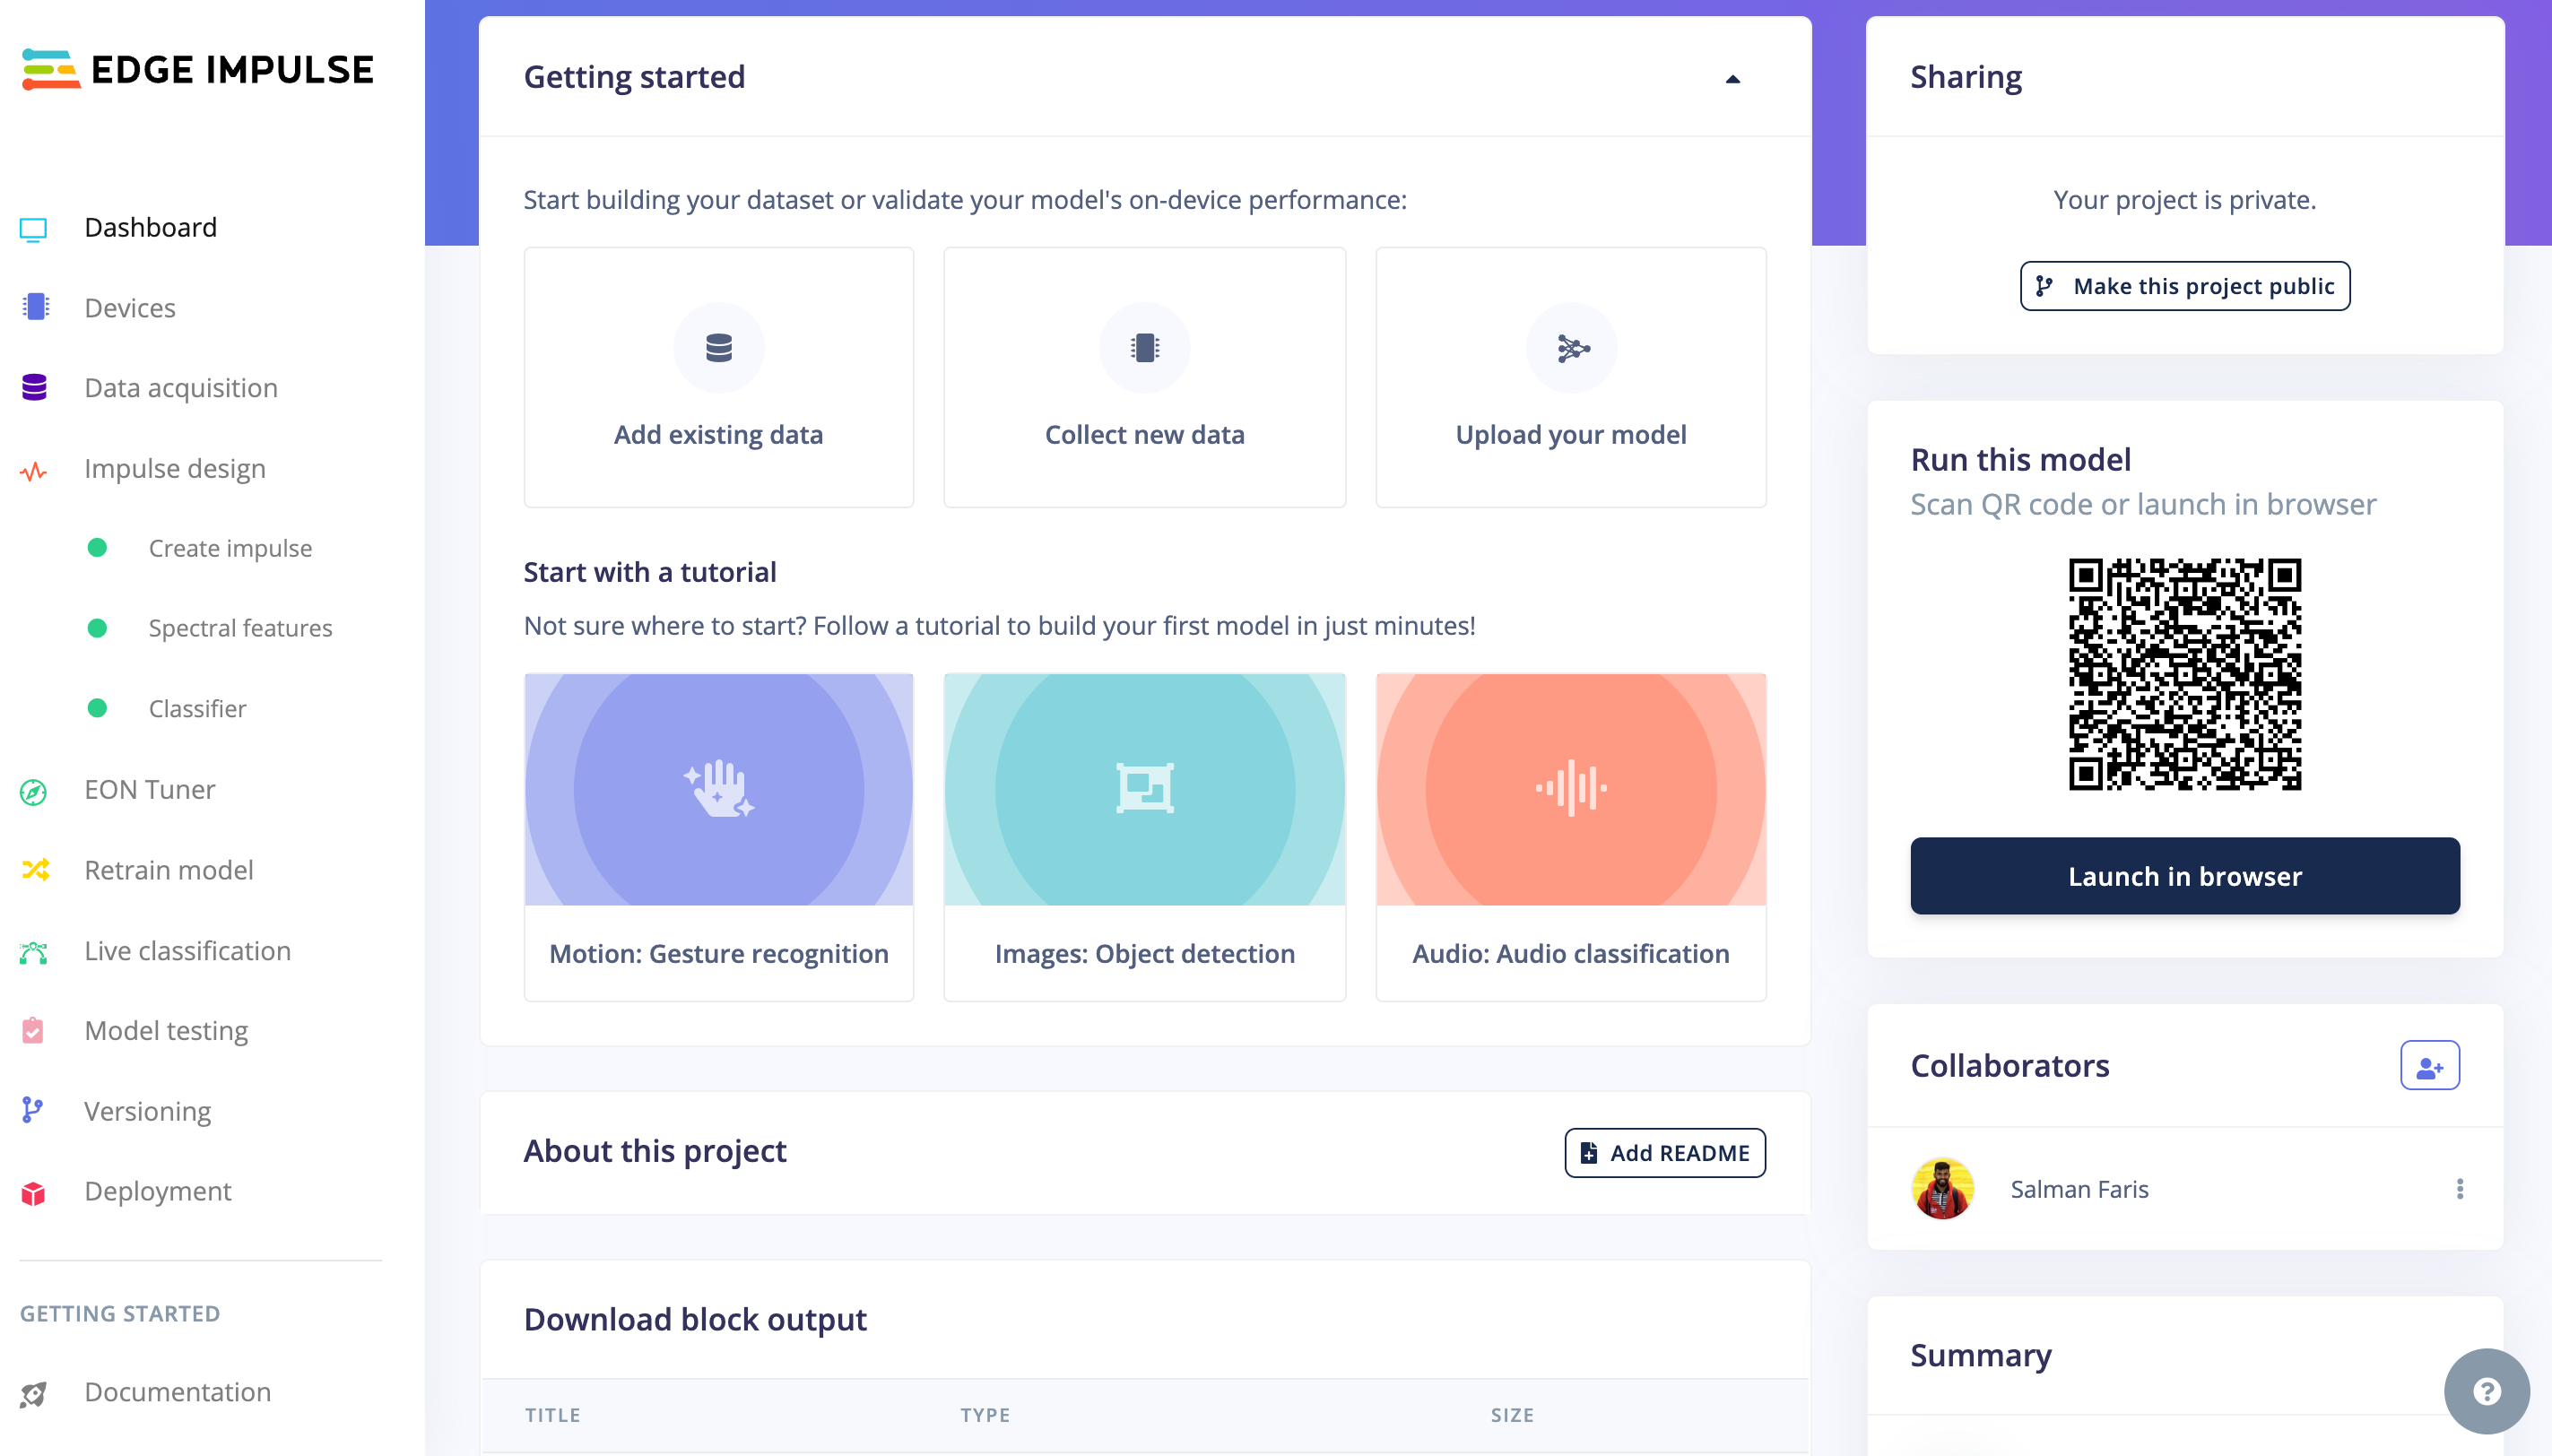
With EdgeImpulse we can
- Collect dataset from the device direclty
- Collect dataset from other source like .zip file, via api or other third party cloud ingestion
- Create test and train data and put them in different lables
- Train our model
- Able to Select approriate ML algoirthms - EI provide recommended ML algorithms based on our dataset
- Deploy it on our harware
- TinyML project collabration with version controlling
- and much more that helps you to build tinyML applications.
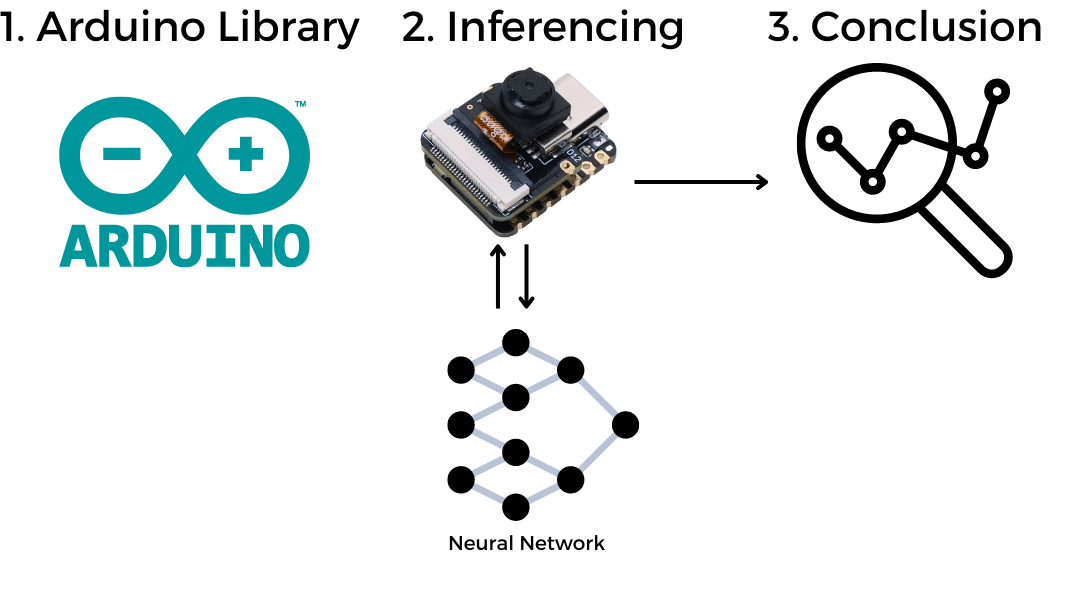
Quick hands-on experience
Before going through the full process of learning Edge Impulse, we provide the full pre-generated arduino libraries and you can see the results by flashing this arduino program from the sketch directly to XIAO ESP32S3 Sense.
Setup XIAO ESPS3 Sense on Arduino
Before start using the Edge impulse libraies, we need to setup XIAO ESPS3 on Arduino IDE, please go throgh the guide here
Compile and Upload Blink Example
// the setup function runs once when you press reset or power the board
void setup() {
  // initialize digital pin LED_BUILTIN as an output.
  pinMode(LED_BUILTIN, OUTPUT);
}

// the loop function runs over and over again forever
void loop() {
  digitalWrite(LED_BUILTIN, HIGH);  // turn the LED on (HIGH is the voltage level)
  delay(1000);                      // wait for a second
  digitalWrite(LED_BUILTIN, LOW);   // turn the LED off by making the voltage LOW
  delay(1000);                      // wait for a second
}
Makesure to select the right board and correct port before uploading.
ToDO
- Install XIAO ESPS3 Board on Arduino IDE
- Compile and Upload Blink Example on XIAO ESPS3
Available Edge Impulse libraries
We're also moving forward in parallel with making some Edge Impulse exported Arduino libraries that have been verified and edited to work directly with XIAO ESP32S3 Sense. When we are using the Libraries, we have more control in our program and we can make decisions.
- Speech keyword recognition (Yes & No) Arduino Library
- Fruit identification (apples, bananas, grapes) Arduino Library
How to use the Edge Impulse Arduino Libraies.
It's like a generic arduino library, we need to install it on Arduino IDE first and use the example code to run the Demo.
Speech keyword recognition (Yes & No) Arduino Library
Demo
How it's works!
/src/img/KWS_Diagram.png)
Step 1. Downaload KWS Demo libray
Download Speech keyword recognition (Yes & No) Arduino Library library as .Zip.
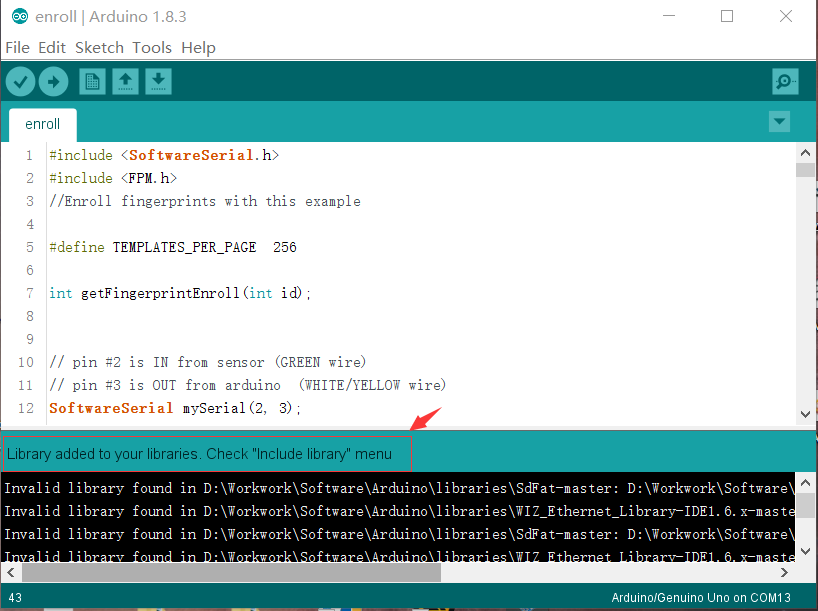
Step 2. Add ZIP Library to Arduino IDE.
Since you have downloaded the zip Library, open your Arduino IDE, click on Sketch > Include Library > Add .ZIP Library.

Choose the zip file you just downloaded,and if the library install correct, you will see Library added to your libraries in the notice window. Which means the library is installed successfully.
Step 3. Run Inferencing Sketch
/* Edge Impulse Arduino examples
* Copyright (c) 2022 EdgeImpulse Inc.
*
* Permission is hereby granted, free of charge, to any person obtaining a copy
* of this software and associated documentation files (the "Software"), to deal
* in the Software without restriction, including without limitation the rights
* to use, copy, modify, merge, publish, distribute, sublicense, and/or sell
* copies of the Software, and to permit persons to whom the Software is
* furnished to do so, subject to the following conditions:
*
* The above copyright notice and this permission notice shall be included in
* all copies or substantial portions of the Software.
*
* THE SOFTWARE IS PROVIDED "AS IS", WITHOUT WARRANTY OF ANY KIND, EXPRESS OR
* IMPLIED, INCLUDING BUT NOT LIMITED TO THE WARRANTIES OF MERCHANTABILITY,
* FITNESS FOR A PARTICULAR PURPOSE AND NONINFRINGEMENT. IN NO EVENT SHALL THE
* AUTHORS OR COPYRIGHT HOLDERS BE LIABLE FOR ANY CLAIM, DAMAGES OR OTHER
* LIABILITY, WHETHER IN AN ACTION OF CONTRACT, TORT OR OTHERWISE, ARISING FROM,
* OUT OF OR IN CONNECTION WITH THE SOFTWARE OR THE USE OR OTHER DEALINGS IN THE
* SOFTWARE.
*
* This code was adapted by Marcelo Rovai to run on a XIAO ESP32S3
* 29May23
* Modified by Salman Faris
* 14Aug23
*
*/
// If your target is limited in memory remove this macro to save 10K RAM
#define EIDSP_QUANTIZE_FILTERBANK 0
/*
** NOTE: If you run into TFLite arena allocation issue.
**
** This may be due to may dynamic memory fragmentation.
** Try defining "-DEI_CLASSIFIER_ALLOCATION_STATIC" in boards.local.txt (create
** if it doesn't exist) and copy this file to
** `<ARDUINO_CORE_INSTALL_PATH>/arduino/hardware/<mbed_core>/<core_version>/`.
**
** See
** (https://support.arduino.cc/hc/en-us/articles/360012076960-Where-are-the-installed-cores-located-)
** to find where Arduino installs cores on your machine.
**
** If the problem persists then there's not enough memory for this model and application.
*/
/* Includes ---------------------------------------------------------------- */
#include <XIAO_esp32S3_YesNo_inferencing.h>
#include <I2S.h>
#define SAMPLE_RATE 16000U
#define SAMPLE_BITS 16
/** Audio buffers, pointers and selectors */
typedef struct {
int16_t *buffer;
uint8_t buf_ready;
uint32_t buf_count;
uint32_t n_samples;
} inference_t;
static inference_t inference;
static const uint32_t sample_buffer_size = 2048;
static signed short sampleBuffer[sample_buffer_size];
static bool debug_nn = false; // Set this to true to see e.g. features generated from the raw signal
static bool record_status = true;
/**
* @brief Arduino setup function
*/
void setup() {
// put your setup code here, to run once:
Serial.begin(115200);
pinMode(LED_BUILTIN, OUTPUT);
// comment out the below line to cancel the wait for USB connection (needed for native USB)
while (!Serial)
;
Serial.println("Edge Impulse Inferencing Demo");
I2S.setAllPins(-1, 42, 41, -1, -1);
if (!I2S.begin(PDM_MONO_MODE, SAMPLE_RATE, SAMPLE_BITS)) {
Serial.println("Failed to initialize I2S!");
while (1)
;
}
// summary of inferencing settings (from model_metadata.h)
ei_printf("Inferencing settings:\n");
ei_printf("\tInterval: ");
ei_printf_float((float)EI_CLASSIFIER_INTERVAL_MS);
ei_printf(" ms.\n");
ei_printf("\tFrame size: %d\n", EI_CLASSIFIER_DSP_INPUT_FRAME_SIZE);
ei_printf("\tSample length: %d ms.\n", EI_CLASSIFIER_RAW_SAMPLE_COUNT / 16);
ei_printf("\tNo. of classes: %d\n", sizeof(ei_classifier_inferencing_categories) / sizeof(ei_classifier_inferencing_categories[0]));
ei_printf("\nStarting continious inference in 2 seconds...\n");
ei_sleep(2000);
if (microphone_inference_start(EI_CLASSIFIER_RAW_SAMPLE_COUNT) == false) {
ei_printf("ERR: Could not allocate audio buffer (size %d), this could be due to the window length of your model\r\n", EI_CLASSIFIER_RAW_SAMPLE_COUNT);
return;
}
ei_printf("Recording...\n");
}
/**
* @brief Arduino main function. Runs the inferencing loop.
*/
void loop() {
bool m = microphone_inference_record();
if (!m) {
ei_printf("ERR: Failed to record audio...\n");
return;
}
signal_t signal;
signal.total_length = EI_CLASSIFIER_RAW_SAMPLE_COUNT;
signal.get_data = µphone_audio_signal_get_data;
ei_impulse_result_t result = { 0 };
EI_IMPULSE_ERROR r = run_classifier(&signal, &result, debug_nn);
if (r != EI_IMPULSE_OK) {
ei_printf("ERR: Failed to run classifier (%d)\n", r);
return;
}
int pred_index = 0; // Initialize pred_index
float pred_value = 0; // Initialize pred_value
 // print the predictions
  ei_printf("Predictions ");
  ei_printf("(DSP: %d ms., Classification: %d ms., Anomaly: %d ms.)",
            result.timing.dsp, result.timing.classification, result.timing.anomaly);
  ei_printf(": \n");
  for (size_t ix = 0; ix < EI_CLASSIFIER_LABEL_COUNT; ix++) {
    ei_printf("    %s: ", result.classification[ix].label);
    ei_printf_float(result.classification[ix].value);
    ei_printf("\n");

    if (result.classification[ix].value > pred_value) {
      pred_index = ix;
      pred_value = result.classification[ix].value;
    }
  }

    // Display inference result
    if ((pred_index == 0 && (pred_value > 0.8))) {
      digitalWrite(LED_BUILTIN, HIGH);  //Turn on
    } else if ((pred_index == 2) && (pred_value > 0.8)) {
      digitalWrite(LED_BUILTIN, LOW);  //Turn off
    } else {
      //nothing to do.
    }
#if EI_CLASSIFIER_HAS_ANOMALY == 1
ei_printf(" anomaly score: ");
ei_printf_float(result.anomaly);
ei_printf("\n");
#endif
}
static void audio_inference_callback(uint32_t n_bytes) {
for (int i = 0; i < n_bytes >> 1; i++) {
inference.buffer[inference.buf_count++] = sampleBuffer[i];
if (inference.buf_count >= inference.n_samples) {
inference.buf_count = 0;
inference.buf_ready = 1;
}
}
}
static void capture_samples(void *arg) {
const int32_t i2s_bytes_to_read = (uint32_t)arg;
size_t bytes_read = i2s_bytes_to_read;
while (record_status) {
/* read data at once from i2s */
esp_i2s::i2s_read(esp_i2s::I2S_NUM_0, (void *)sampleBuffer, i2s_bytes_to_read, &bytes_read, 100);
if (bytes_read <= 0) {
ei_printf("Error in I2S read : %d", bytes_read);
} else {
if (bytes_read < i2s_bytes_to_read) {
ei_printf("Partial I2S read");
}
// scale the data (otherwise the sound is too quiet)
for (int x = 0; x < i2s_bytes_to_read / 2; x++) {
sampleBuffer[x] = (int16_t)(sampleBuffer[x]) * 8;
}
if (record_status) {
audio_inference_callback(i2s_bytes_to_read);
} else {
break;
}
}
}
vTaskDelete(NULL);
}
/**
* @brief Init inferencing struct and setup/start PDM
*
* @param[in] n_samples The n samples
*
* @return { description_of_the_return_value }
*/
static bool microphone_inference_start(uint32_t n_samples) {
inference.buffer = (int16_t *)malloc(n_samples * sizeof(int16_t));
if (inference.buffer == NULL) {
return false;
}
inference.buf_count = 0;
inference.n_samples = n_samples;
inference.buf_ready = 0;
// if (i2s_init(EI_CLASSIFIER_FREQUENCY)) {
// ei_printf("Failed to start I2S!");
// }
ei_sleep(100);
record_status = true;
xTaskCreate(capture_samples, "CaptureSamples", 1024 * 32, (void *)sample_buffer_size, 10, NULL);
return true;
}
/**
* @brief Wait on new data
*
* @return True when finished
*/
static bool microphone_inference_record(void) {
bool ret = true;
while (inference.buf_ready == 0) {
delay(10);
}
inference.buf_ready = 0;
return ret;
}
/**
* Get raw audio signal data
*/
static int microphone_audio_signal_get_data(size_t offset, size_t length, float *out_ptr) {
numpy::int16_to_float(&inference.buffer[offset], out_ptr, length);
return 0;
}
/**
* @brief Stop PDM and release buffers
*/
static void microphone_inference_end(void) {
free(sampleBuffer);
ei_free(inference.buffer);
}
#if !defined(EI_CLASSIFIER_SENSOR) || EI_CLASSIFIER_SENSOR != EI_CLASSIFIER_SENSOR_MICROPHONE
#error "Invalid model for current sensor."
#endif
Copy the above code or download from here and then upload the code to the XIAO.
// print the predictions
ei_printf("Predictions ");
ei_printf("(DSP: %d ms., Classification: %d ms., Anomaly: %d ms.)",
result.timing.dsp, result.timing.classification, result.timing.anomaly);
ei_printf(": \n");
for (size_t ix = 0; ix < EI_CLASSIFIER_LABEL_COUNT; ix++) {
ei_printf(" %s: ", result.classification[ix].label);
ei_printf_float(result.classification[ix].value);
ei_printf("\n");
if (result.classification[ix].value > pred_value) {
pred_index = ix;
pred_value = result.classification[ix].value;
}
}
// Display inference result
if ((pred_index == 0 && (pred_value > 0.8))) {
digitalWrite(LED_BUILTIN, HIGH); //Turn on
} else if ((pred_index == 2) && (pred_value > 0.8)) {
digitalWrite(LED_BUILTIN, LOW); //Turn off
} else {
//nothing to do.
}
In the above code, we can see where did make the decisions to TURN ON the LED, and OFF it. We can also put other logic here and make KWS to control our projects.
Fruit identification (apples, bananas, grapes) Arduino Library
Step 1. Downaload Fruit identification libray
Download Fruit identification (apples, bananas, grapes) Arduino Library library as .Zip.
Step 2. Add ZIP Library to Arduino IDE.
Since you have downloaded the zip Library, open your Arduino IDE, click on Sketch > Include Library > Add .ZIP Library.
Choose the zip file you just downloaded,and if the library install correct, you will see Library added to your libraries in the notice window. Which means the library is installed successfully.
Step 3. Run the example sketch
You can find the example sketch under the Files -> Examples -> xiao-esp323-fruits-classify_inferencing -> XIAO-ESP32S3-Sense
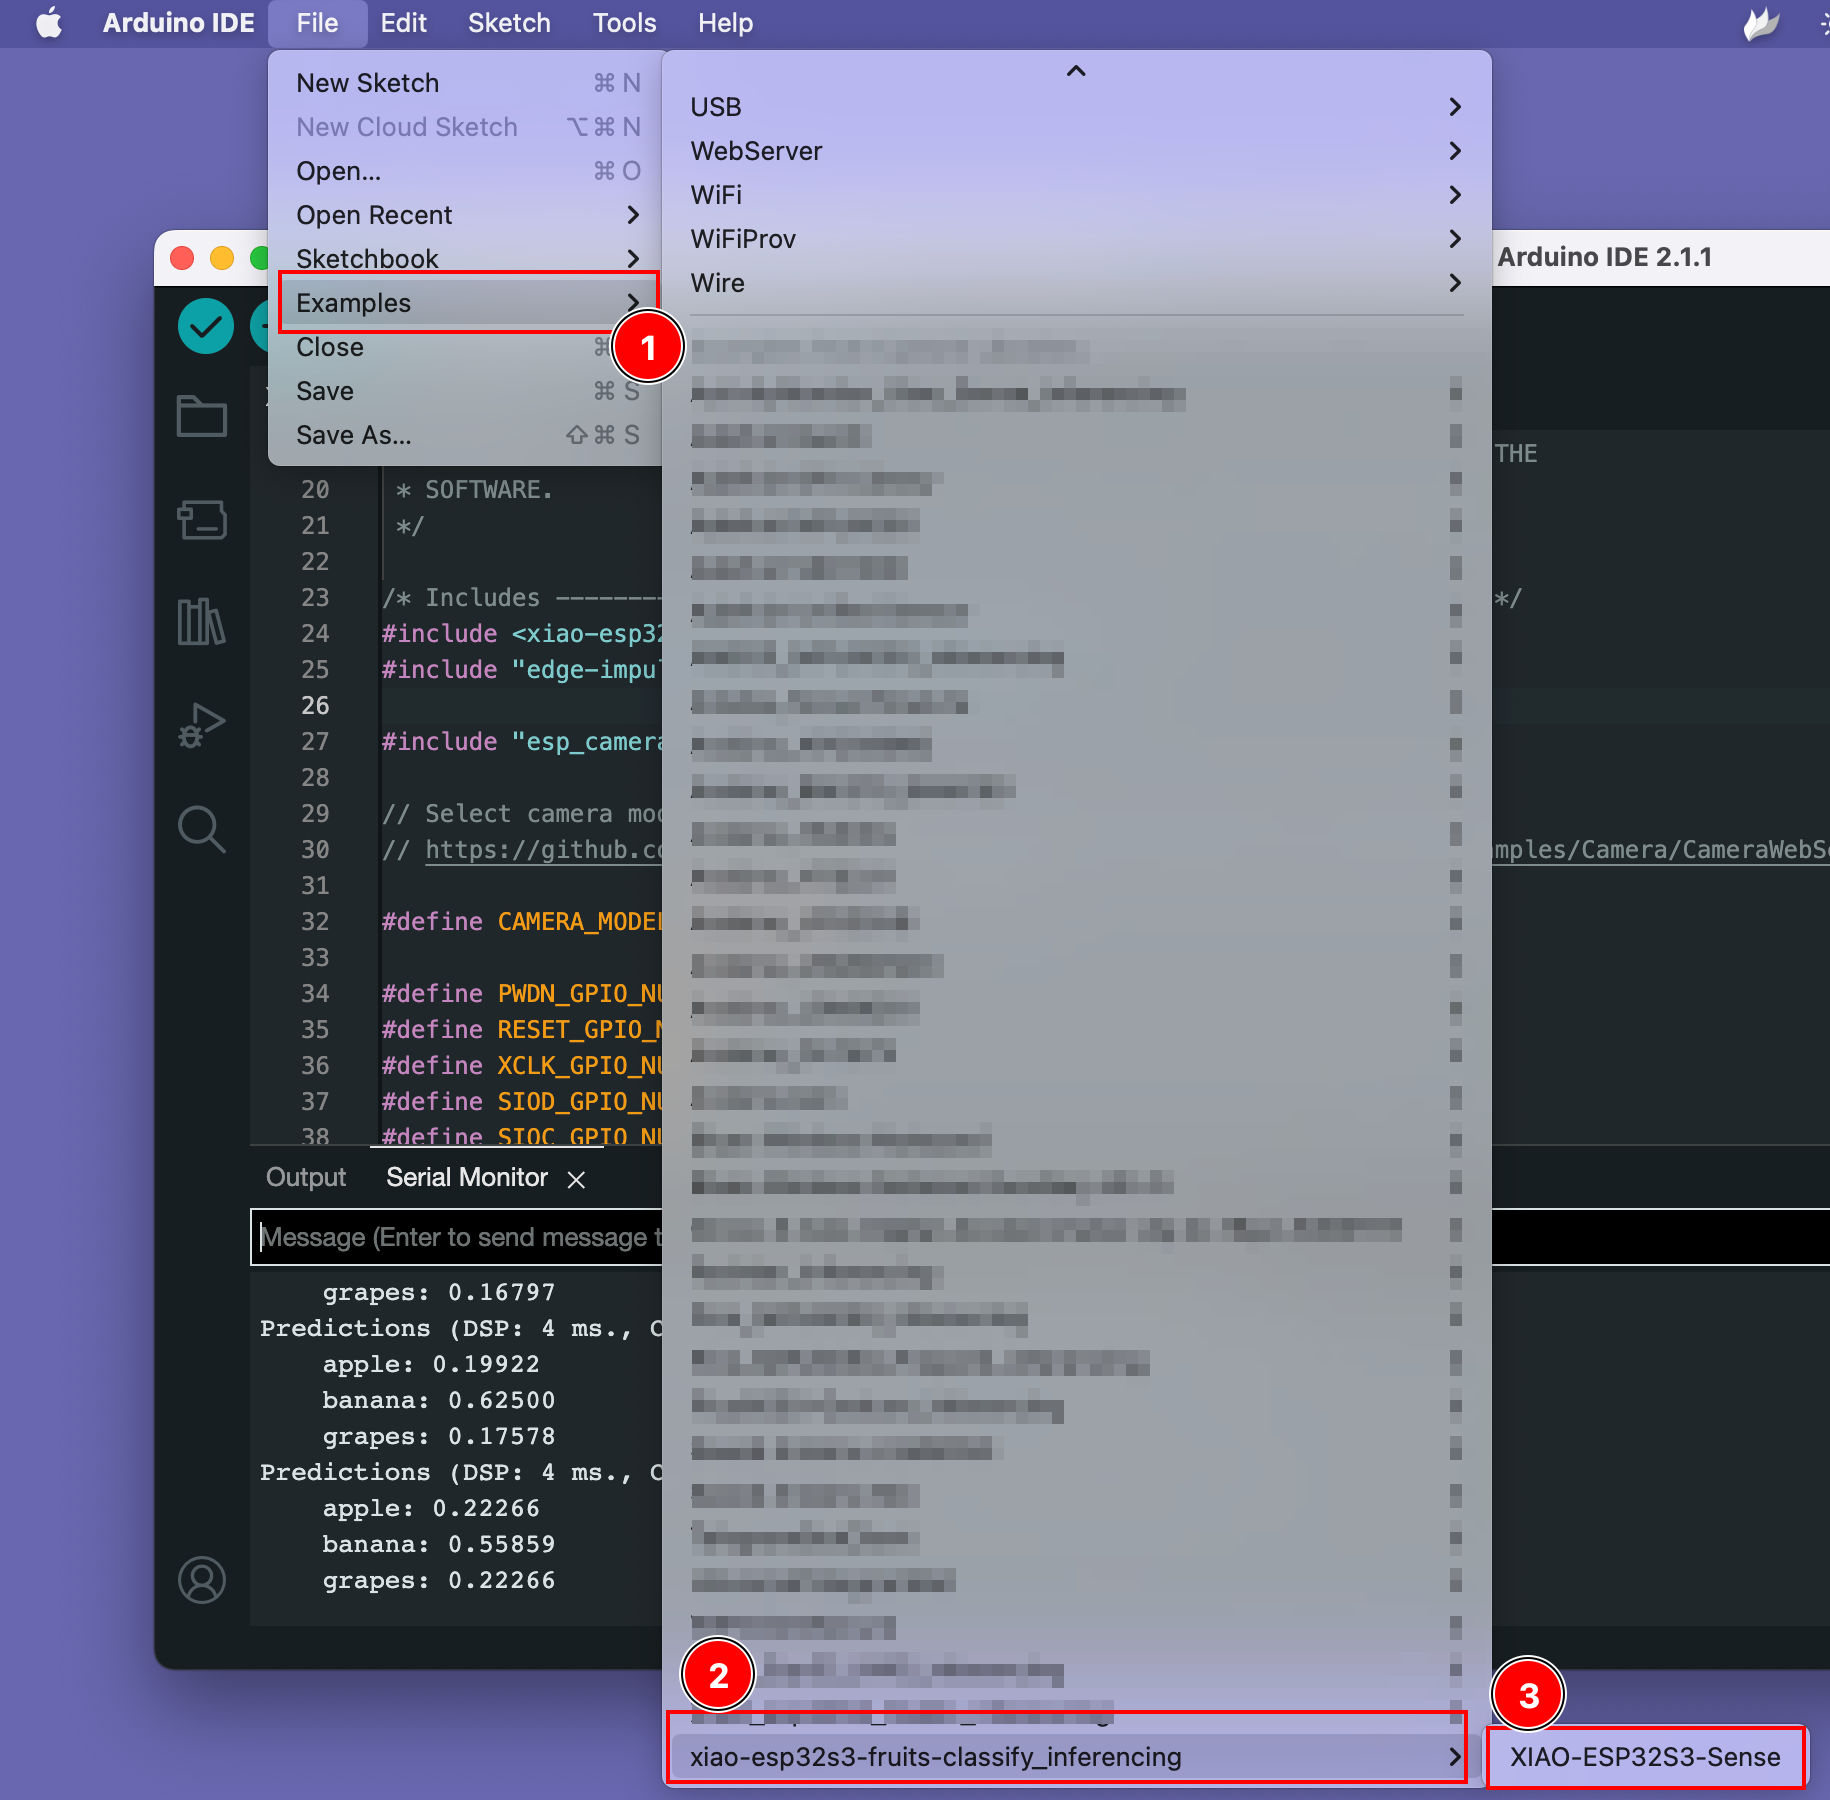
Try out the demo.
Open the data set sample page from here and open the fruit image, then point the XIAO ESP32S3 camera to the fruit image and see results on the screen.
ToDo
- Install XIAO ESPS3 on Arduino
- Compile and Upload
- Install KWS Arduino library and run example.
- Install Image Recongition library and run example.
Resources
- [GITHUB] SenseCraft Model Assistant Models
- [GITHUB] Project Github
- [EDGE-IMPULSE] edge impulse KWS demo
- [EDGE-IMPULSE] edge impulse Fruits classify demo