Rainbowduino v3.0

The Rainbowduino board is an Arduino compatible controller board with professional multiplexed LED driver. It can drive an 8x8 RGB Led Matrix or a 4x4x4 RGB LED Cube in common Anode mode. Rainbowduino v3.0 uses two MY9221 chips which is a 12-channels (R/G/B x 4) constant current Adaptive Pulse Density Modulation(APDM). Rainbowduino v3.0 has provisions for cascading more such boards with I2C interface.
Rainbowduino v3.0 is flashed with Arduino boot-loader and this makes it easy to program sketches using Arduino IDE. Unlike other LED drivers, this comes with a USB to UART (FT232RL) inbuilt for programming the sketches.

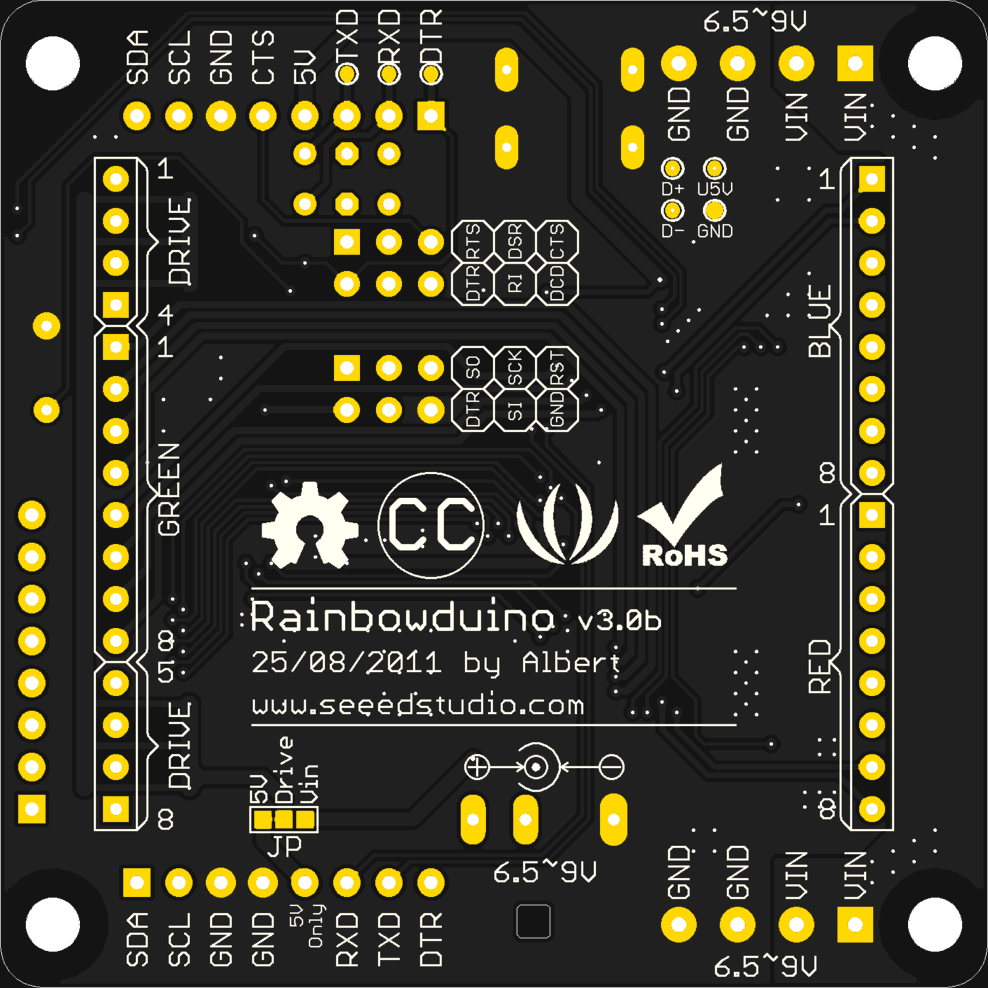 Rainbowduino v3.0 bottom
Features
| Parameter | Value |
|---|---|
| Constant current output | 20.8mA |
| Pin headers | 2 x 16 for connecting multiplexed LEDs |
| Maximum LEDs driving capability | 192 (i.e 8x8x3) |
| Supported LED displays | 4x4x4 RGB Cube & 8x8 RGB LED Matrix |
| USB to UART | FT232RL |
| DC Supply | USB powered or External 6V~12V DC |
| Inbuilt Voltage regulator | 5V / 1A |
Application Ideas
- General Purpose LED driver
- Connect 4x4x4 RGB Cube
- Connect 8x8 RGB Matrix
- Create LED sign boards by chaining more than one Rainbowduino v3.0
Usage
Hardware Setup
Always set the slide switch to USB position for programming the Rainbowduino v3.0. Setting the slide switch to HOST position makes the onboard FT232 act as UartSBee (This feature is not required for Rainbowduino v3.0 normal operation)
Connecting to LED matrix is very straight forward.
- Connecting RGB LED Matrix Connect RGB Matrix 2x16 male pin header to Rainbowduino as shown below (See the back of RGB matrix, the 16 male pin header closer to "2088RGB" text marking should be connected to DRIVE - GREEN- DRIVE pin header of Rainbowduino.)

Rainbowduino v3.0 connected to 8x8 RGB LED Matrix
(or)
- Connecting RGB LED Cube Connect Rainbow Cube Kit 2x16 male pin header to Rainbowduino as shown below.

2x16 pin header positioning

A Rainbowduino properly connected to Rainbow Cube kit
- Attach a USB cable to Rainbowduino for programming.
Software Setup
- In Arduino IDE --> Tools --> Board menu, select "Duemilanove or Diecimila".
- Download and install Rainbouduino 3.0 library from the resources section.
Programming
Using with RGB LED Cube
Let us get started with a simple example with RGB LED Cube:
- Download Rainbowduino v3.0 Library from resources.
- Open Cube1.ino sketch (a copy of it is reproduced below):
- Compile and upload the sketch, a copy of which is reproduced below:
/*
 Rainbowduino v3.0 Library examples:  Cube1

 Sets pixels on 3D plane (4x4x4 cube)
*/

#include <Rainbowduino.h>

void setup()
{
  Rb.init(); //initialize Rainbowduino driver
}

void loop()
{
  //Set (Z,X,Y):(0,0,0) pixel BLUE
  Rb.setPixelZXY(0,0,0,0x0000FF); //uses 24bit RGB color Code

  //Set (Z,X,Y):(0,3,0) pixel RED
  Rb.setPixelZXY(0,3,0,0xFF,0,0); //uses R, G and B color bytes

  //Set (Z,X,Y):(3,0,3) pixel GREEN
  Rb.setPixelZXY(3,0,3,0x00FF00); //uses 24bit RGB color Code
}
Output:

Cube1.pde Demo
Rainbowduino v3.0 library provides many APIs for using RGB LED cube. The following section lists and describes them :
| API | Description |
|---|---|
| Rb.init(void) | Initialize Rainbowduino driver, this should be placed inside setup() |
| Rb.setPixelZXY(unsigned char z, unsigned char x, unsigned char y, unsigned char colorR, unsigned char colorG, unsigned char colorB) | This sets the pixel(z,x,y)by specifying each channel(color) with 8bit number. |
| Rb.setPixelZXY(unsigned char z, unsigned char x, unsigned char y, uint32_t colorRGB) | This sets the pixel(z,x,y)by specifying a 24bit RGB color code. |
| Rb.blankDisplay(void) | This function is used to blank all the LEDs. |
setPixelZXY() Demo
- To understand the (Z,X,Y) pixel addressing let us see another example. In this demo, the Layer 0 (i.e Z-0) is painted Green and Layer 3 is painted Blue.
/*
 Rainbowduino v3.0 Library examples:  Cube2

 Sets pixels on 3D plane (4x4x4 cube)
*/

#include <Rainbowduino.h>

void setup()
{
  Rb.init(); //initialize Rainbowduino driver
}

unsigned int z,x,y;

void loop()
{
  for(x=0;x<4;x++)
  {
    for(y=0;y<4;y++)
    {
     //Paint layer 0 Green
     Rb.setPixelZXY(0,x,y,0x00FF00); //uses 24bit RGB color Code
    }
  }

  for(x=0;x<4;x++)
  {
    for(y=0;y<4;y++)
    {
     //Paint layer 3 Blue
     Rb.setPixelZXY(3,x,y,0x0000FF); //uses 24bit RGB color Code
    }
  }
}
Output:

Cube2.pde Demo
setPixelZXY() Random Colors Demo
- In this demo, all LEDs are painted with some random color. After five seconds of delay, the whole cube is repainted with random colors.
    /*
     Rainbowduino v3.0 Library examples:  Cube3

     Sets pixels on 3D plane (4x4x4 cube)
    */

    #include <Rainbowduino.h>

    void setup()
    {
      Rb.init(); //initialize Rainbowduino driver
    }

    unsigned int z,x,y;

    void loop()
    {
     for(z=0;z<4;z++)
     {
      for(x=0;x<4;x++)
      {
        for(y=0;y<4;y++)
        {
         //Paint random colors
         Rb.setPixelZXY(z,x,y,random(0xFF),random(0xFF),random(0xFF)); //uses R, G and B color bytes
        }
      }
     }
    delay(5000);
    Rb.blankDisplay(); //Clear the LEDs (make all blank)
    }
Output:

Cube3.pde Demo
Night Lamp / Mood Lamp Demo
/*

 Rainbowduino v3.0 Library examples : Mood Lamp

*/

#include <Rainbowduino.h>


// HSV to RGB array

unsigned char RED[64] = {255,255,255,255,255,255,255,255,255,255,255,255,255,255,255,255,238,221,204,188,171,154,137,119,102,85,
68,51,34,17,0,0,0,0,0,0,0,0,0,0,0,0,0,0,0,0,0,0,0,0,0,0,0,0,0,0,0,0,0,0,0,17,35,52};

unsigned char GREEN[64] = {0,17,34,51,68,85,102,119,136,153,170,187,204,221,238,255,255,255,255,255,255,255,255,255,255,255,255,
255,255,255,255,255,255,255,255,255,255,255,255,255,255,255,255,255,255,255,238,221,204,188,170,154,136,120,102,86,68,52,34,18,0,0,0,0};

unsigned char BLUE[64] = {0,0,0,0,0,0,0,0,0,0,0,0,0,0,0,0,0,0,0,0,0,0,0,0,0,0,0,0,0,0,0,18,34,52,68,86,102,120,136,154,170,188,
204,221,238,255,255,255,255,255,255,255,255,255,255,255,255,255,255,255,255,255,255,255};

void setup()
{
  Rb.init(); //initialize Rainbowduino driver
}

unsigned int z,x,y;
void loop()
{

for(z=0; z<64 ;z++)
{
 for(x=0;x<8;x++)
 {
    for(y=0;y<8;y++)
    {
     //Paint random colors
     //Rb.setPixelZXY(z,x,y,RED[i],GREEN[i],BLUE[i]); //uses R, G and B color bytes
     Rb.setPixelXY(x,y,RED[z],GREEN[z],BLUE[z]); //uses R, G and B color bytes
    }
 }
 delay(100);
}

for(z=63; z > 0 ;z--)
{
 for(x=0;x<8;x++)
 {
    for(y=0;y<8;y++)
    {
     //Paint random colors
     //Rb.setPixelZXY(z,x,y,RED[i],GREEN[i],BLUE[i]); //uses R, G and B color bytes
     Rb.setPixelXY(x,y,RED[z],GREEN[z],BLUE[z]); //uses R, G and B color bytes
    }
 }
 delay(100);
}

}
Plasma Cube
/*

 Rainbowduino v3.0 Library examples : 3D Plasma

*/

#include <Rainbowduino.h>

// HSV to RGB array

unsigned char RED[64] = {255,255,255,255,255,255,255,255,255,255,255,255,255,255,255,255,238,221,204,188,171,154,137,119,102,85,
68,51,34,17,0,0,0,0,0,0,0,0,0,0,0,0,0,0,0,0,0,0,0,0,0,0,0,0,0,0,0,0,0,0,0,17,35,52};

unsigned char GREEN[64] = {0,17,34,51,68,85,102,119,136,153,170,187,204,221,238,255,255,255,255,255,255,255,255,255,255,255,255,
255,255,255,255,255,255,255,255,255,255,255,255,255,255,255,255,255,255,255,238,221,204,188,170,154,136,120,102,86,68,52,34,18,0,0,0,0};

unsigned char BLUE[64] = {0,0,0,0,0,0,0,0,0,0,0,0,0,0,0,0,0,0,0,0,0,0,0,0,0,0,0,0,0,0,0,18,34,52,68,86,102,120,136,154,170,188,
204,221,238,255,255,255,255,255,255,255,255,255,255,255,255,255,255,255,255,255,255,255};

unsigned char plasma[4][4][4];

void setup()
{
  Rb.init(); //initialize Rainbowduino driver

  for(unsigned char x = 0; x < 4; x++)
  {
    for(unsigned char y = 0; y < 4; y++)
    {
      for(unsigned char z = 0; z < 4; z++)
       {
        int color = int(32.0 + (32.0 * sin(x / 1.0))+ 32.0 + (32.0 * sin(y / 1.0)) + 32.0 + (32.0 * sin(z / 1.0))) / 3;
        plasma[x][y][z] = color;
       }
    }
  }
}

unsigned char x,y,z,colorshift=0;

void loop()
{
for(x=0;x<4;x++)
{
 for(y=0;y<4;y++)
 {
  for(z=0;z<4;z++)
    {
     Rb.setPixelZXY(z,x,y,(RED[plasma[x][y][z] + colorshift]) % 256,(GREEN[plasma[x][y][z] + colorshift]) % 256,(BLUE[plasma[x][y][z] + colorshift]) % 256); //uses R, G and B color bytes
    }
 }
}
 delay(100);
 colorshift=  colorshift + 1;
}
Output:

PlasmaCube.pde Demo
Using with RGB LED Matrix
Rainbowduino v3.0 library provides many APIs for using RGB LED matrix. The following section lists and describes them :
| API | Description |
|---|---|
| Rb.init(void) | Initialize Rainbowduino driver, this should be placed inside setup() |
| Rb.setPixelXY(unsigned char x, unsigned char y, unsigned char colorR, unsigned char colorG, unsigned char colorB) | This sets the pixel(x,y)by specifying each channel(color) with 8bit number. |
| Rb.setPixelXY(unsigned char x, unsigned char y, uint32_t colorRGB) | This sets the pixel(x,y)by specifying a 24bit RGB color code. |
| Rb.blankDisplay(void) | This function is used to blank all the LEDs. |
| Rb.drawChar(unsigned char ascii, unsigned int poX, unsigned int poY, uint32_t colorRGB) | Draw an ASCII character of uint32_t color at (poX,poY). |
| Rb.drawCircle(int poX, int poY, int r, uint32_t color) | Draw a uint32_t color circle of radius r at (poX,poY). |
| Rb.fillCircle(int poX, int poY, int r, uint32_t color) | Draw a fill uint32_t color circle of radius r at (poX,poY). |
| Rb.drawLine(unsigned int x0,unsigned int y0,unsigned int x1,unsigned int y1, uint32_t color) | Draw a line from (x0,y0) to (x1,y1). |
| Rb.drawVerticalLine(unsigned int poX, unsigned int poY,unsigned int length, uint32_t color) | Draw a horizontal line from (poX,poY) of length pixels. |
| Rb.drawRectangle(unsigned int poX, unsigned int poY, unsigned int length,unsigned int width, uint32_t color) | Draw a rectangle line from (poX,poY) of length and width pixels. |
| Rb.fillRectangle(unsigned int poX, unsigned int poY, unsigned int length, unsigned int width, uint32_t color) | Draw a filled rectangle line from (poX,poY) of length and width pixels. |
Shapes Demo
    /*
     Rainbowduino v3.0 Library examples:

     Print Shapes on 2D plane (8x8 matrix)

    */

    #include <Rainbowduino.h>

    void setup()
    {
      Rb.init();
    }

    unsigned char x,y,z;

    void loop()
    {

         Rb.drawCircle(3, 4, 3, 0xFF0000); // draw a red circle of radius 3 at (3,4).
         delay(1000);
         Rb.blankDisplay();

         Rb.fillCircle(3, 4, 2, 0x0000FF); // draw a filled blue circle of radius 2 at (3,4).
         delay(1000);
         Rb.blankDisplay();

         Rb.drawLine(0, 0, 7, 7, 0x00FF00); // draw a line from (0,0) to (7,7).
         delay(1000);
         Rb.blankDisplay();

         Rb.drawVerticalLine(0, 0, 7, random(0xFFFFFF)); // draw a vertical line from (0,0) of length 7 pixels
         delay(1000);
         Rb.blankDisplay();

         Rb.drawHorizontalLine(0, 0, 7, random(0xFFFFFF)); // draw a horizontal line from (0,0) of length 7 pixels
         delay(1000);
         Rb.blankDisplay();

         Rb.drawRectangle(0, 0, 4, 6, random(0xFFFFFF)); // draw a rectangle line from (0,0) of length 4 and width 6 pixels
         delay(1000);
         Rb.blankDisplay();

         Rb.fillRectangle(0, 0, 7, 7, random(0xFFFFFF)); // draw a filled rectangle line from (0,0) of length and width 7 pixels
         delay(1000);
         Rb.blankDisplay();

    }
Output:

Shapes
drawChar Demo
/*
 Rainbowduino v3.0 Library examples:

 Print Chars on 2D plane (8x8 matrix)

*/

#include <Rainbowduino.h>

void setup()
{
  Rb.init();
}

unsigned char x,y,z;

void loop()
{

  for(int i= 0x20; i<=0x7E; i++) //generates ASCII value of all printable characters
  {
     Rb.drawChar(i,0,1,random(0xFFFFFF));
     delay(500);
     Rb.blankDisplay();
  }

}
Output:

Schematic Online Viewer
Resources
- Rainbowduino V3.0 Library for Arduino IDE 1.0 & above
- Rainbowduino3.0 SnakeGame Library for Arduino 1.0
- Rainbowduino V3.0 Schematic and Layout in Eagle format
- Rainbowduino V3.0 Schematic in PDF
- MY9221 LED driver Datasheet
Other related products,resources and projects:
- Rainbow Cube Kit (Assembled)
- Rainbow Cube kit- RGB 4X4X4
- 60mm square 8*8 LED Matrix - super bright RGB
Tech Support & Product Discussion
Thank you for choosing our products! We are here to provide you with different support to ensure that your experience with our products is as smooth as possible. We offer several communication channels to cater to different preferences and needs.