Wio Node
Building IoT projects is exciting, as you can connect almost everything around you and control them. However sometime it is not easy to build IoT applications since it requires a lot of hard works, such as hardware, programming, jump wires and soldering etc. Even a well-trained user would spend hours to handle all the work, let alone beginners. In order to simplify the development of IoT project, Seeed launched Wio Link on kickstarter and it turn out a big success. The slogan on Kickstarter well defined the main feature of Wio link:
3 steps. 5 minutes. Build your own IoT applications!
It is so simple, it is fast building, however it is not ideal for all conditions. What if we only need 2 grove connectors? What if there is limited space in the application but Wio Link is over sized? What if we want to cost down? So right after we released Wio Link, a micro and economic solution was put on schedule, for months Seeeder has redesigned and optimized the Wi-Fi board and here it is, the new member of Wio family---Wio Node.
Just like the meaning of its name, Wio Node is truly a Wi-Fi node that connect things in IoT project. If Wio Link is big brother, Wio Node must be the little brother in the Wio family coz this cute little guy is only quarter size of Wio link while integrates all the basic features of Wio Link.
The ecosystem of Wio Node also consists of Open Hardware Wio Node board, Open Source Wio Link Mobile App and Open Source IoT Server implementation. So the software platform for Wio Link is also available for Wio Node.

The Wio IFTTT function is EOL. But Wio APP is available. You can use the API from Wio APP to read sensor status and control the actuator.
Features
- No hardware programming or No breadboard or No jumper wires or No soldering required.
- A lot of Grove modules are supported (Check the list in Mobile App).
- Plug-n-Play Grove Modules
- Visual configuration instead of microcontroller programming.
- Update automatically via cloud compiling and OTA.
- Bring Real-world to Virtual platform. All sensors become virtual RESTful API.
- Android & iOS Apps to manage Wio Node.
- IFTTT supported by Seeed's Channel
- CE/FCC/TELEC Certified for core module ESP-WROOM-02
Specifications
| General | Value | Power Management | Value |
|---|---|---|---|
| Size | 28mm * 28mm | DC Current Per I/O Pin | 12mA |
| Crystal | 26MHz | Input Voltage (Micro USB) | 5V |
| Flash Memory | 4MBytes (W25Q32B) | Input Voltage (Battery holder) | 3.4~4.2V |
| Wi-Fi Network Protocol | 802.11b/g/n | Output DC Current | 1000mA MAX |
| Wi-Fi Encryption Technology | WEP/TKIP/AES | Operating Voltage | 3.3V |
| Expansion Grove Connector1 | UART0/I2C0/D0 | Charge Current | 500mA MAX |
| Expansion Grove Connector2 | Analog/I2C1/D1 |
Application Ideas
Wio Node is well designed to provide simple and economic Wi-Fi solutions for projects like:
- Smart Home
- Intelligent environmental monitoring
- Funny Toys
- Web of Things
- Internet of Things
In fact, there're many projects in our recipe, come and visit it to find some interesting projects or even share you own projects, I am sure it will gain a lot of fans for you.
| Irrigation control system | The internet of led wall | Dog feeding machine |
|---|---|---|
 |  |  |
| MAKE IT NOW | MAKE IT NOW | MAKE IT NOW |
| Kickstarter Monitor | MIssing Call Monitor | Boss Key |
|---|---|---|
 |  |  |
| MAKE IT NOW | MAKE IT NOW | MAKE IT NOW |
Some of the recipes are made by Wio Link, you can replace it with a Wio Node.
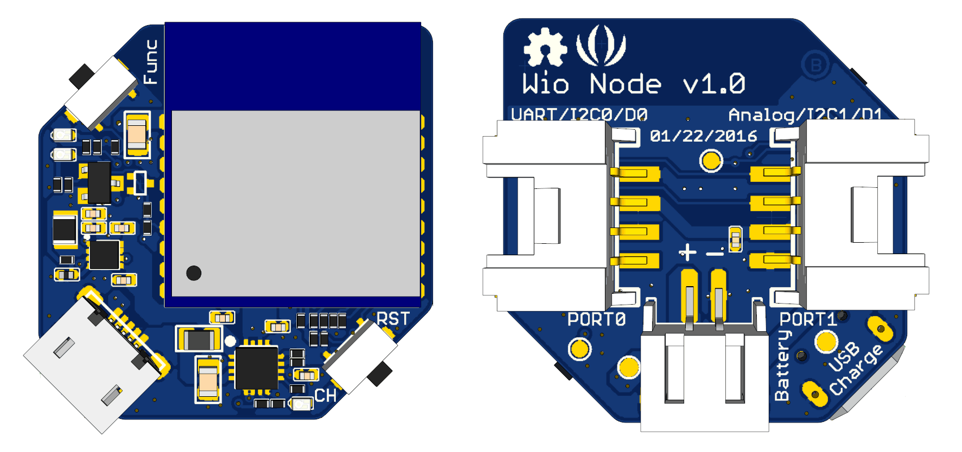
Hardware Overview
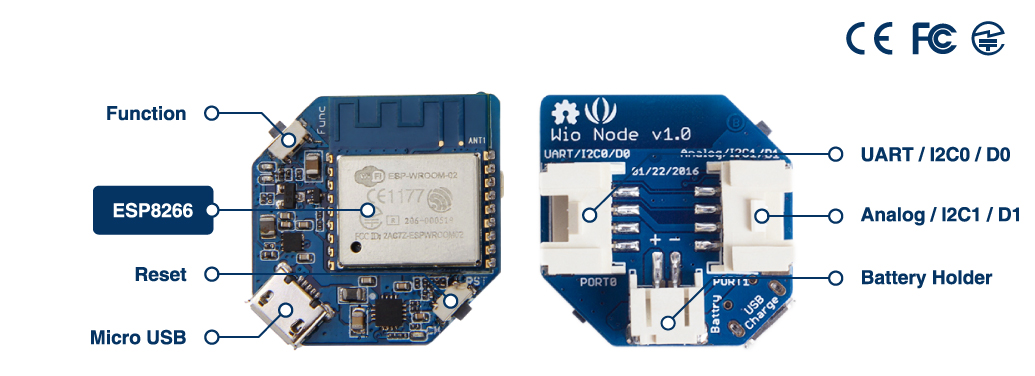
| No. | Name | Function |
|---|---|---|
| 1 | Function | Set Wio Node working mode |
| 2 | ESP8266 | Microcontroller based on ESP8266 |
| 3 | Reset | Reset the device |
| 4 | Micro USB | Supply the device and charge the battery |
| 5 | Battery Holder | A jst2.0 connector, connect a 3.7V Li-Battery |
| 6 | Analog/I2C1/D1 | Grove port, you can connect a Digital/I2C/Analog type Grove module |
| 7 | UART/I2C0/D0 | Grove port, you can connect a UART/I2C/Digital type Grove module |
Status LEDs
Near to the FUNCTION button there're 2 status Leds, a blue one and a red one. The BLUE led is the network status indicating led. It has the following blink patterns:
- breathing Under configuration mode
- blink twice quickly then off 1s requesting IP address from router
- blink once quickly then off 1s connecting to the server
- on 1s then off 1s The node is online
- on constantly the node is dead for not getting IP or not connecting to server.
- blink quickly (on 100ms then off 100ms) OTA
The BLUE led is attached to GPIO2 which is also the TX pin of UART1. When downloading firmware, the UART1 dumps the data transmitting on UART0 by instinct. So the BLUE led will blink while downloading firmware. After startup the GPIO2 will be configured as a GPIO not TX of UART1.
The RED led is another status led which indicates the power status of Grove modules. All the six Grove interface's VCC converge together and can be controlled with GPIO 15. When the node is in deep sleep mode, all the grove modules lose their power too. The RED led will light on when Grove modules are powered and will go off when Grove modules aren't powered.
Bonus
Wio Node has an inbuilt LiPo battery charger, so you can charge 3.7v LiPo battery through JST 2.0 Port when USB is connecting.
Please handle the USB micro type-B socket gently, or you may break the socket apart from the board.
Battery is not included in the package. But we have arranged plenty of choices for you in Bazzar.
Get Started
Let us build a very basic LED application with Wio Node, in this application you will be able to control LED by your smartphone in about 5 minutes. Before we start, please make sure you have below things on hand:
| Wio Node | Grove - LED | Micro USB Cable |
|---|---|---|
 |  |  |
| GET ONE NOW | GET ONE NOW | GET ONE NOW |
A smartphone is needed as well (Android OS version 4.1 or advanced, iOS version 7 or advanced)
Grove - LED include a Grove cable already
STEP 1: Install Android/iOS App
You need to install the Wio Link App to manage and configure your Wio Node devices.
Download the Android or iOS App and install. Or you can go to app store of Apple or Google market and search "Wio Link", you will find it.
 |  |
|---|---|
| Get Android App | Get iOS App |
Make sure your Android OS version is 4.1 or advanced, iOS version is 7 or advanced.
STEP 2: Create your Account
- If it is your first time to use Wio APP, it may require GPS authorization, please approve it, then sign up.
- If you already have an account, check the server location before logging in.
Please pay attention to the server location, because wrong server location will lead to failure when connecting to Wio Node.

STEP 3: Connect Wio Node to Internet
- Push and hold the CONFIG button until the blue LED turns into breathing mode (i.e. blinking with fade in & fade out effect). It means that Wio Node has turned to configuration mode successfully and can be detected by the Wio App.

- Push "Add your first Device".
- Choose Wio Node
- "Go to Wi-Fi list" will lead you to the Wi-Fi setting interface of your smartphone.
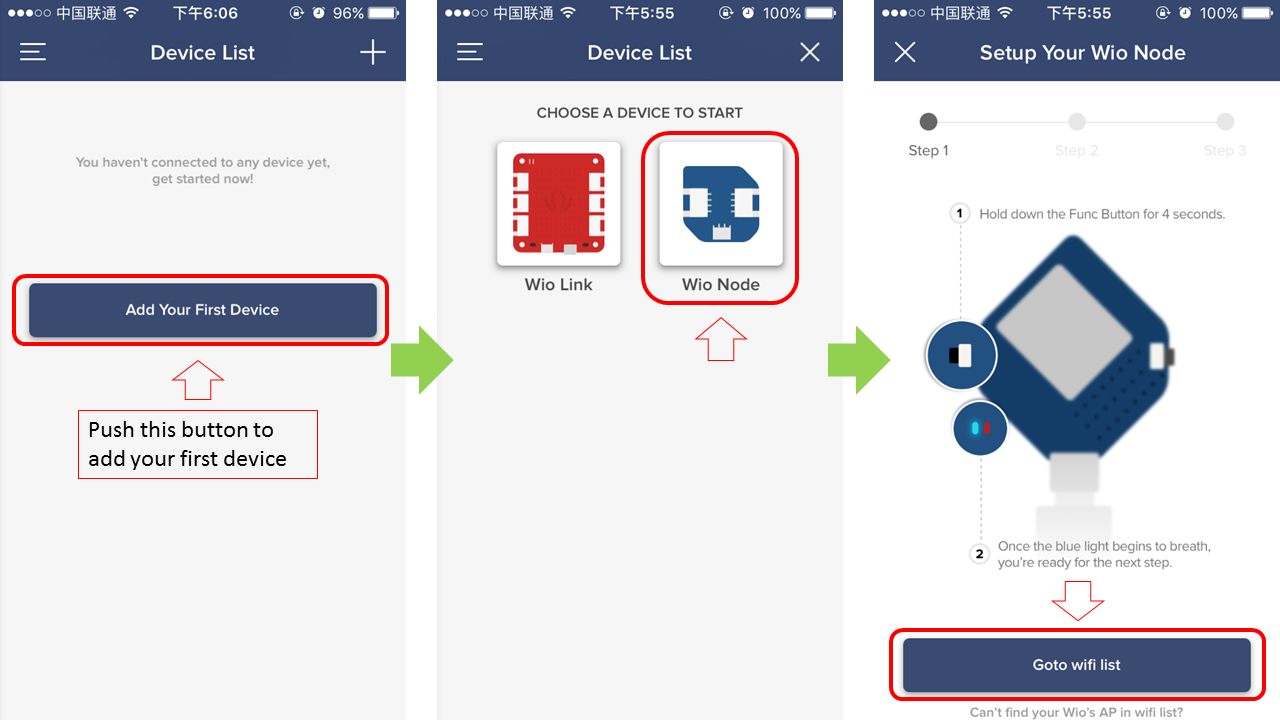
- If you have successfully made the blue LED turn into breathing mode, you will find the Wio Node in the Wi-Fi list, connect to it!(Usually it is not called Wio Node in the Wi-Fi list, in the example, mine is Wio_091016, you may find one named wio_xxxxxx in your list.)
- Once connected, you will receive a notice, then you can go back to the app
- Next step is connecting to the Wi-Fi of your home or company
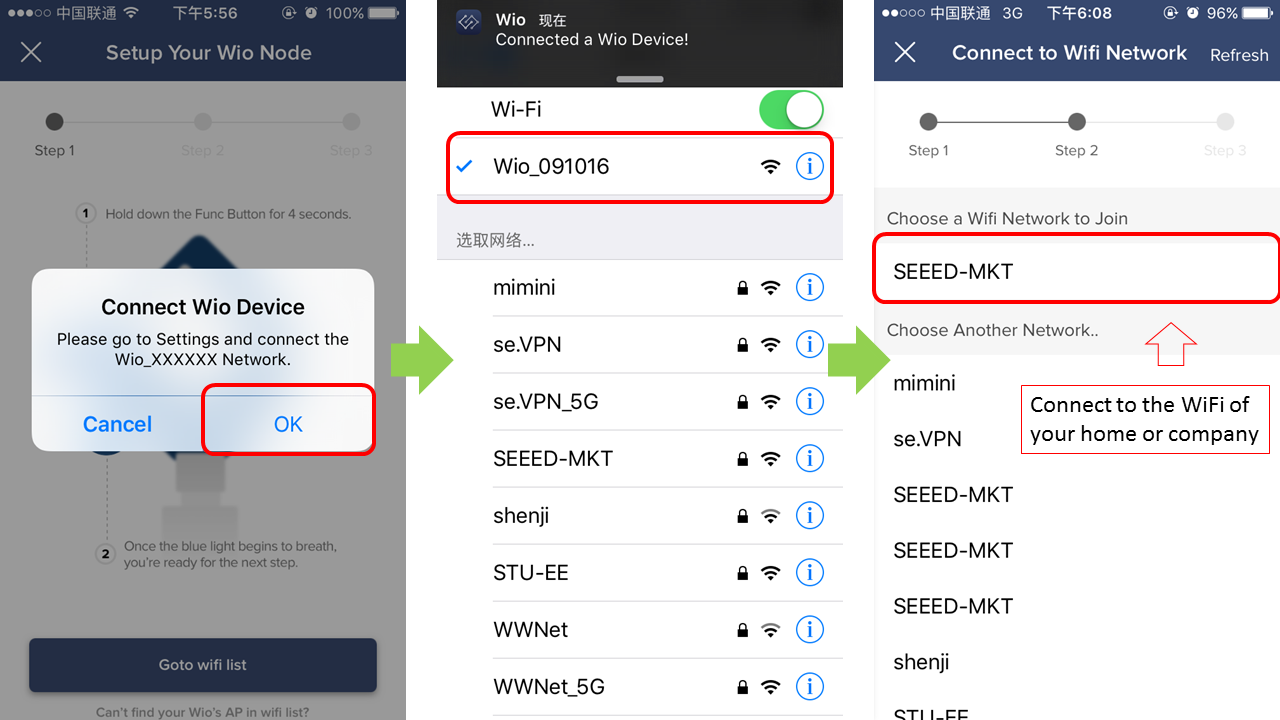
- If there is password pf the Wi-Fi you want to connect, it may require you to enter the password
- Consider that you may need to connect more than 1 Wio Node in the future, a special name will make you distinguish them from each other easily.

STEP 4: Virtually interconnect modules with Wio Node and update firmware
- Click the Wio Node and you will be in the main interface.
- There are 2 grove connectors, select the left one (D0).
- Because LED is output devices. Choose output category
- Find the icon that looks like a bulb, choose it.
- Then you will find the bottom rectangle button becomes red and "View API" becomes "Update Firmware". Choose "Update Firmware"

- Since you selected the D0 port to connect with LED in the APP, you need to connect the real Grove-LED to D0 port of Wio Node too.

STEP 5: Test application using APIs
- Now that you have successfully connect the LED to Wio Node, click "View API" to check the API of Wio Node
- Input "1" or "0" in the "Test Request" area, and click "Post" button and see what will happen.

Get started with IFTTT & DoButton
Dont't know how to code? Don't worry, with the help of IFTTT, even if you know nothing about coding, you are still able to build some simple projects.
IFTTT is an abbreviation of "If This Then That", it is a free web-based service that allows users to create chains of simple conditional statements, called "recipes", which are triggered based on changes to other web services such as Gmail, Facebook, Instagram. How does IFTTT work with Wio Node? As you can see in below pictures, seeed provided cloud service at wio.seeed.io, which can interchange data and send instructions to IFTTT and Wio Node. So by creating some simple recipe, you are able to hack things without coding.

If you don't have an IFTTT account, click here to sign up.
If you already have an IFTTT account,click here to connect with Seeed, or search Seeed at IFTTT website. There you will find 9 recipes by Seeed to teach you how to us e IFTTT.
 What is DoButton? DoButton is one of IFTTT's application that empowers you to create your own personalized button with just a tap, it is very suitable for building IoT projects and control it through your smartphone, here are two examples to show you how to use IFTTT&DoButton to make useful applications.
Example
| IFTTT | DoButton |
|---|---|
| [Recipe]DIY an Automatic Garden Irrigation without coding | [Recipe]How to feed your pets when you're not home |
| [Video]How to use ITFFF | [Video]How to use DoButton |
Advanced Guide
Feel those examples too simple? Wanna make more complicated proejects? Here are the best guides for advanced users to hack things with Wio nude. By these guides, advanced users are able to know more detail information about Wio Node, deploy private server, even write module driver for Wio Node.

The guide covers:
- API Reference
- Server Deployment Guide
- Advanced User Guide
- How to write module driver for Wio Link?
The guide is writen for Wio Link, but applies to Wio Node as well.
Grove Support List
| SKU | Name | Interface | Driver | Link |
|---|---|---|---|---|
| 101020008 | Grove - Moisture Sensor | Analog | itself | link |
| 101020014 | Grove - Light Sensor | Analog | Generic Analog Input | link |
| 101020015 | Grove - Temperature Sensor | Analog | itself | link |
| 101020017 | Grove - Rotary Angle Sensor | Analog | Generic Analog Input | link |
| 101020022 | Grove - Light Sensor(P) | Analog | Generic Analog Input | link |
| 101020023 | Grove - Sound Sensor | Analog | ifself | link |
| 101020027 | Grove - Electricity Sensor | Analog | Generic Analog Input | link |
| 101020036 | Grove - Slide Potentiometer | Analog | Generic Analog Input | link |
| 101020042 | Grove - 80cm Infrared Proximity Sensor | Analog | Generic Analog Input | link |
| 101020043 | Grove - UV Sensor | Analog | itself | link |
| 101020048 | Grove - Rotary Angle Sensor(P) | Analog | Generic Analog Input | link |
| 101020063 | Grove - Loudness Sensor | Analog | itself | link |
| 101020076 | Grove - Luminance Sensor | Analog | itself | link |
| 101020078 | Grove - Air quality sensor v1.3 | Analog | Generic Analog Input | link |
| 101020003 | Grove - Button | Digital | itself | link |
| 101020004 | Grove - Switch(P) | Digital | Generic Digital Input | link |
| 101020005 | Grove - Collision Sensor | Digital | Generic Digital Input | link |
| 101020009 | Grove - Line Finder | Digital | Generic Digital Input | link |
| 101020018 | Grove - Water Sensor | Digital | Generic Digital Input | link |
| 101020020 | Grove - PIR Motion Sensor | Digital | itself | link |
| 101020025 | Grove - Tilt Switch | Digital | Generic Digital Input | link |
| 101020037 | Grove - Touch Sensor | Digital | Generic Digital Input | link |
| 101020038 | Grove - Magnetic Switch | Digital | itself | link |
| 101020046 | Grove - Hall Sensor | Digital | itself | link |
| 101020049 | Grove - Flame Sensor | Digital | Generic Digital Input | link |
| 111020000 | Grove - Button(P) | Digital | Generic Digital Input | link |
| 101020073 | Grove - Electromagnet | Digital | itself | link |
| 101020090 | Grove - Water Atomization v1.0 | Digital | Generic Digital Output | link |
| 103020004 | Grove - Solid State Relay | Digital | itself | link |
| 103020005 | Grove - Relay | Digital | itself | link |
| 103020008 | Grove - MOSFET | Digital | Generic Digital Output | link |
| 103020010 | Grove - 2-Coil Latching Relay | Digital | Generic Digital Output | link |
| 103020014 | Grove - Dry-Reed Relay | Digital | itself | link |
| 104020001 | Grove - Variable Color LED | Digital | Generic Digital Output | link |
| 104020002 | Grove - Purple LED (3mm) | Digital | Generic Digital Output | link |
| 104020005 | Grove - LED String Light | Digital | Generic Digital Output | link |
| 104030005 | Grove - Red LED | Digital | Generic Digital Output | link |
| 104030007 | Grove - Green LED | Digital | Generic Digital Output | link |
| 104030009 | Grove - White LED | Digital | Generic Digital Output | link |
| 104030010 | Grove - Blue LED | Digital | Generic Digital Output | link |
| 104030014 | Grove - Multi Color Flash LED (5mm) | Digital | Generic Digital Output | link |
| 105020003 | Grove - Vibration Motor | Digital | Generic Digital Output | link |
| 105020004 | Grove - Mini Fan | Digital | Generic Digital Output | link |
| 105020005 | Grove - EL Driver | Digital | itself | link |
| 107020000 | Grove - Buzzer | Digital | Generic Digital Output | link |
| 107020001 | Grove - Speaker | Digital | itself | link |
| 101020034 | Grove - 3-Axis Digital Compass | I2C | itself | link |
| 101020039 | Grove - 3-Axis Digital Accelerometer(±1.5g) | I2C | itself | link |
| 101020050 | Grove - 3-Axis Digital Gyro | I2C | itself | link |
| 101020072 | Grove - Barometer Sensor (BMP180) | I2C | itself | link |
| 101020083 | Grove - Gesture | I2C | itself | link |
| 101020088 | Grove - Multichannel Gas Sensor | I2C | itself | link |
| 103020013 | Grove - I2C ADC | I2C | itself | link |
| 104030008 | Grove - OLED Display 1.12'' | I2C | itself | link |
| 104030011 | Grove - OLED Display 0.96'' | I2C | itself | link |
| 105020001 | Grove - I2C Motor Driver | I2C | itself | link |
| 107020006 | Grove - I2C FM Receiver | I2C | itself | link |
| 101020192 | Grove - Barometer(BMP280) | I2C | itself | link |
| 101020193 | Grove - Temp&Humi&Barometer Sensor(BME280) | I2C | itself | link |
| 101020010 | Grove - Ultrasonic Ranger | Ditital | itself | link |
| 101020016 | Grove - Infrared Receiver | Digital | itself | link |
| 101020019 | Grove - Temperature&Humidity Sensor Pro | Digital | itself | link |
| 101020026 | Grove - Infrared Emitter | Digital | itself | link |
| 101020029 | Grove - Infrared Reflective Sensor | Others | itself | link |
| 101020030 | Grove - Digital Light Sensor | I2C | itself | link |
| 101020040 | Grove - IR Distance Interrupter | Digital | itself | link |
| 103020018 | Grove - Recorder | Digital | itself | link |
| 104020006 | Grove - LED Bar v2.0 | UART | itself | link |
| 104030003 | Grove - 4-Digit Display | UART | itself | link |
| 316010005 | Grove - Servo | Digital | itself | link |
| 101020067 | Grove - CO2 Sensor | UART | itself | link |
FAQ
Here are some questions that we usually received from new users. If you have any other issues when you are using Wio Node or other Wio products, welcome to the Community of Wio where there are many professional users waiting to give you advices and also many advanced users providing plenty of ideas on how to use Wio products!
Q1. What's the difference between Wio Node and Wio Link?
Wio Node is like mini Wio Link, it is only quarter size of Wio Link and much cheaper. Despite the size and price, Wio Node still has full function of Wio Link. For those who prefer smaller size to more grove connectors. Wio node is the best choice.
2. What should I do if can't connect with Server?
Log out and check if you chose wrong server before logging in. If you are not in China Mainland, please choose global server.
3. Fail to configure Wio Node and can't find Wio Node in wifi list?
Pay attention to the blue LED. Make sure it is in breathing mode (blinking with fade in & fade out effect, it is a very unique mode, very easy to recognize) before any further steps. Only the LED in breathing mode can Wio Node be found in WiFi list.
4. If I want to connect more than 1 I2C devices, what should I do?
We can not connect 2 Grove-I2C devices to Wio node 2 Grove-I2C Port at the same time. Grove-I2C hub can branch 1 I2C port into 4. Come to Bazzar to get one!
5. Can I change Wio Node into sleep mode?
Yes, please check the last API, where you can command Wio Node into sleep mode.
Schematic Online Viewer
Resources
- Documentation and references
- Software
- Hardware
- Certificate
Projects
Smart Home with Wio Link/Wio Node and Telegram App: Building a smart home with seeedstudio Wio-Link/Wio-Node and connect it to Telegram bot.
Tech Support & Product Discussion
Thank you for choosing our products! We are here to provide you with different support to ensure that your experience with our products is as smooth as possible. We offer several communication channels to cater to different preferences and needs.